¶ Quick Setup Guide
You are now ready to set up your convention’s registration page. Getting your registration page setup quickly is a critical first step for your attendees to register for your convention. This guide will go through the basic options to get your page up and running quickly with badges that are for sale right away.
Full documentation on each section will be linked should you want to deviate from the quick setup.
Basic Checklist:
- Select or Create the Convention
- Create (Badge) Types
- Create Sales Items For Badges
- Create Main Registration Landing Page
- Explore and Customize your Convention
¶ Select/Create Your Convention
By default your first convention is created by Cardboard Events during setup.
- Login to https://manage.cardboardevents.com
- Click on the Convention tile that you want to work with.
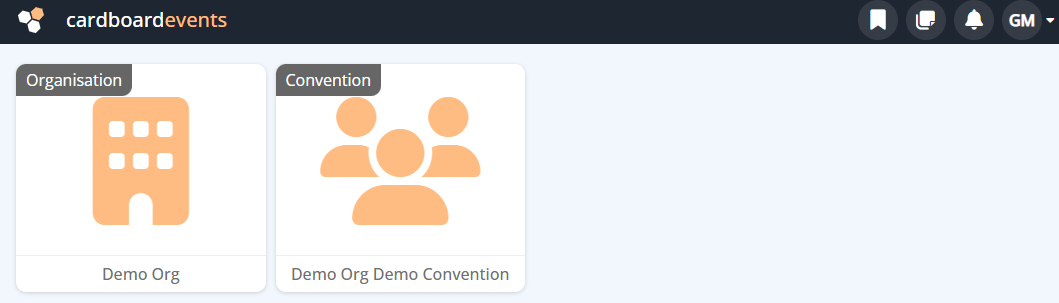
If your Convention has not been made you'll need to Create one on the Organization Level.
- Login to https://manage.cardboardevents.com
- Click the Organization Tile that the convention will belong to.
- Click Conventions.
- Click +(Create).
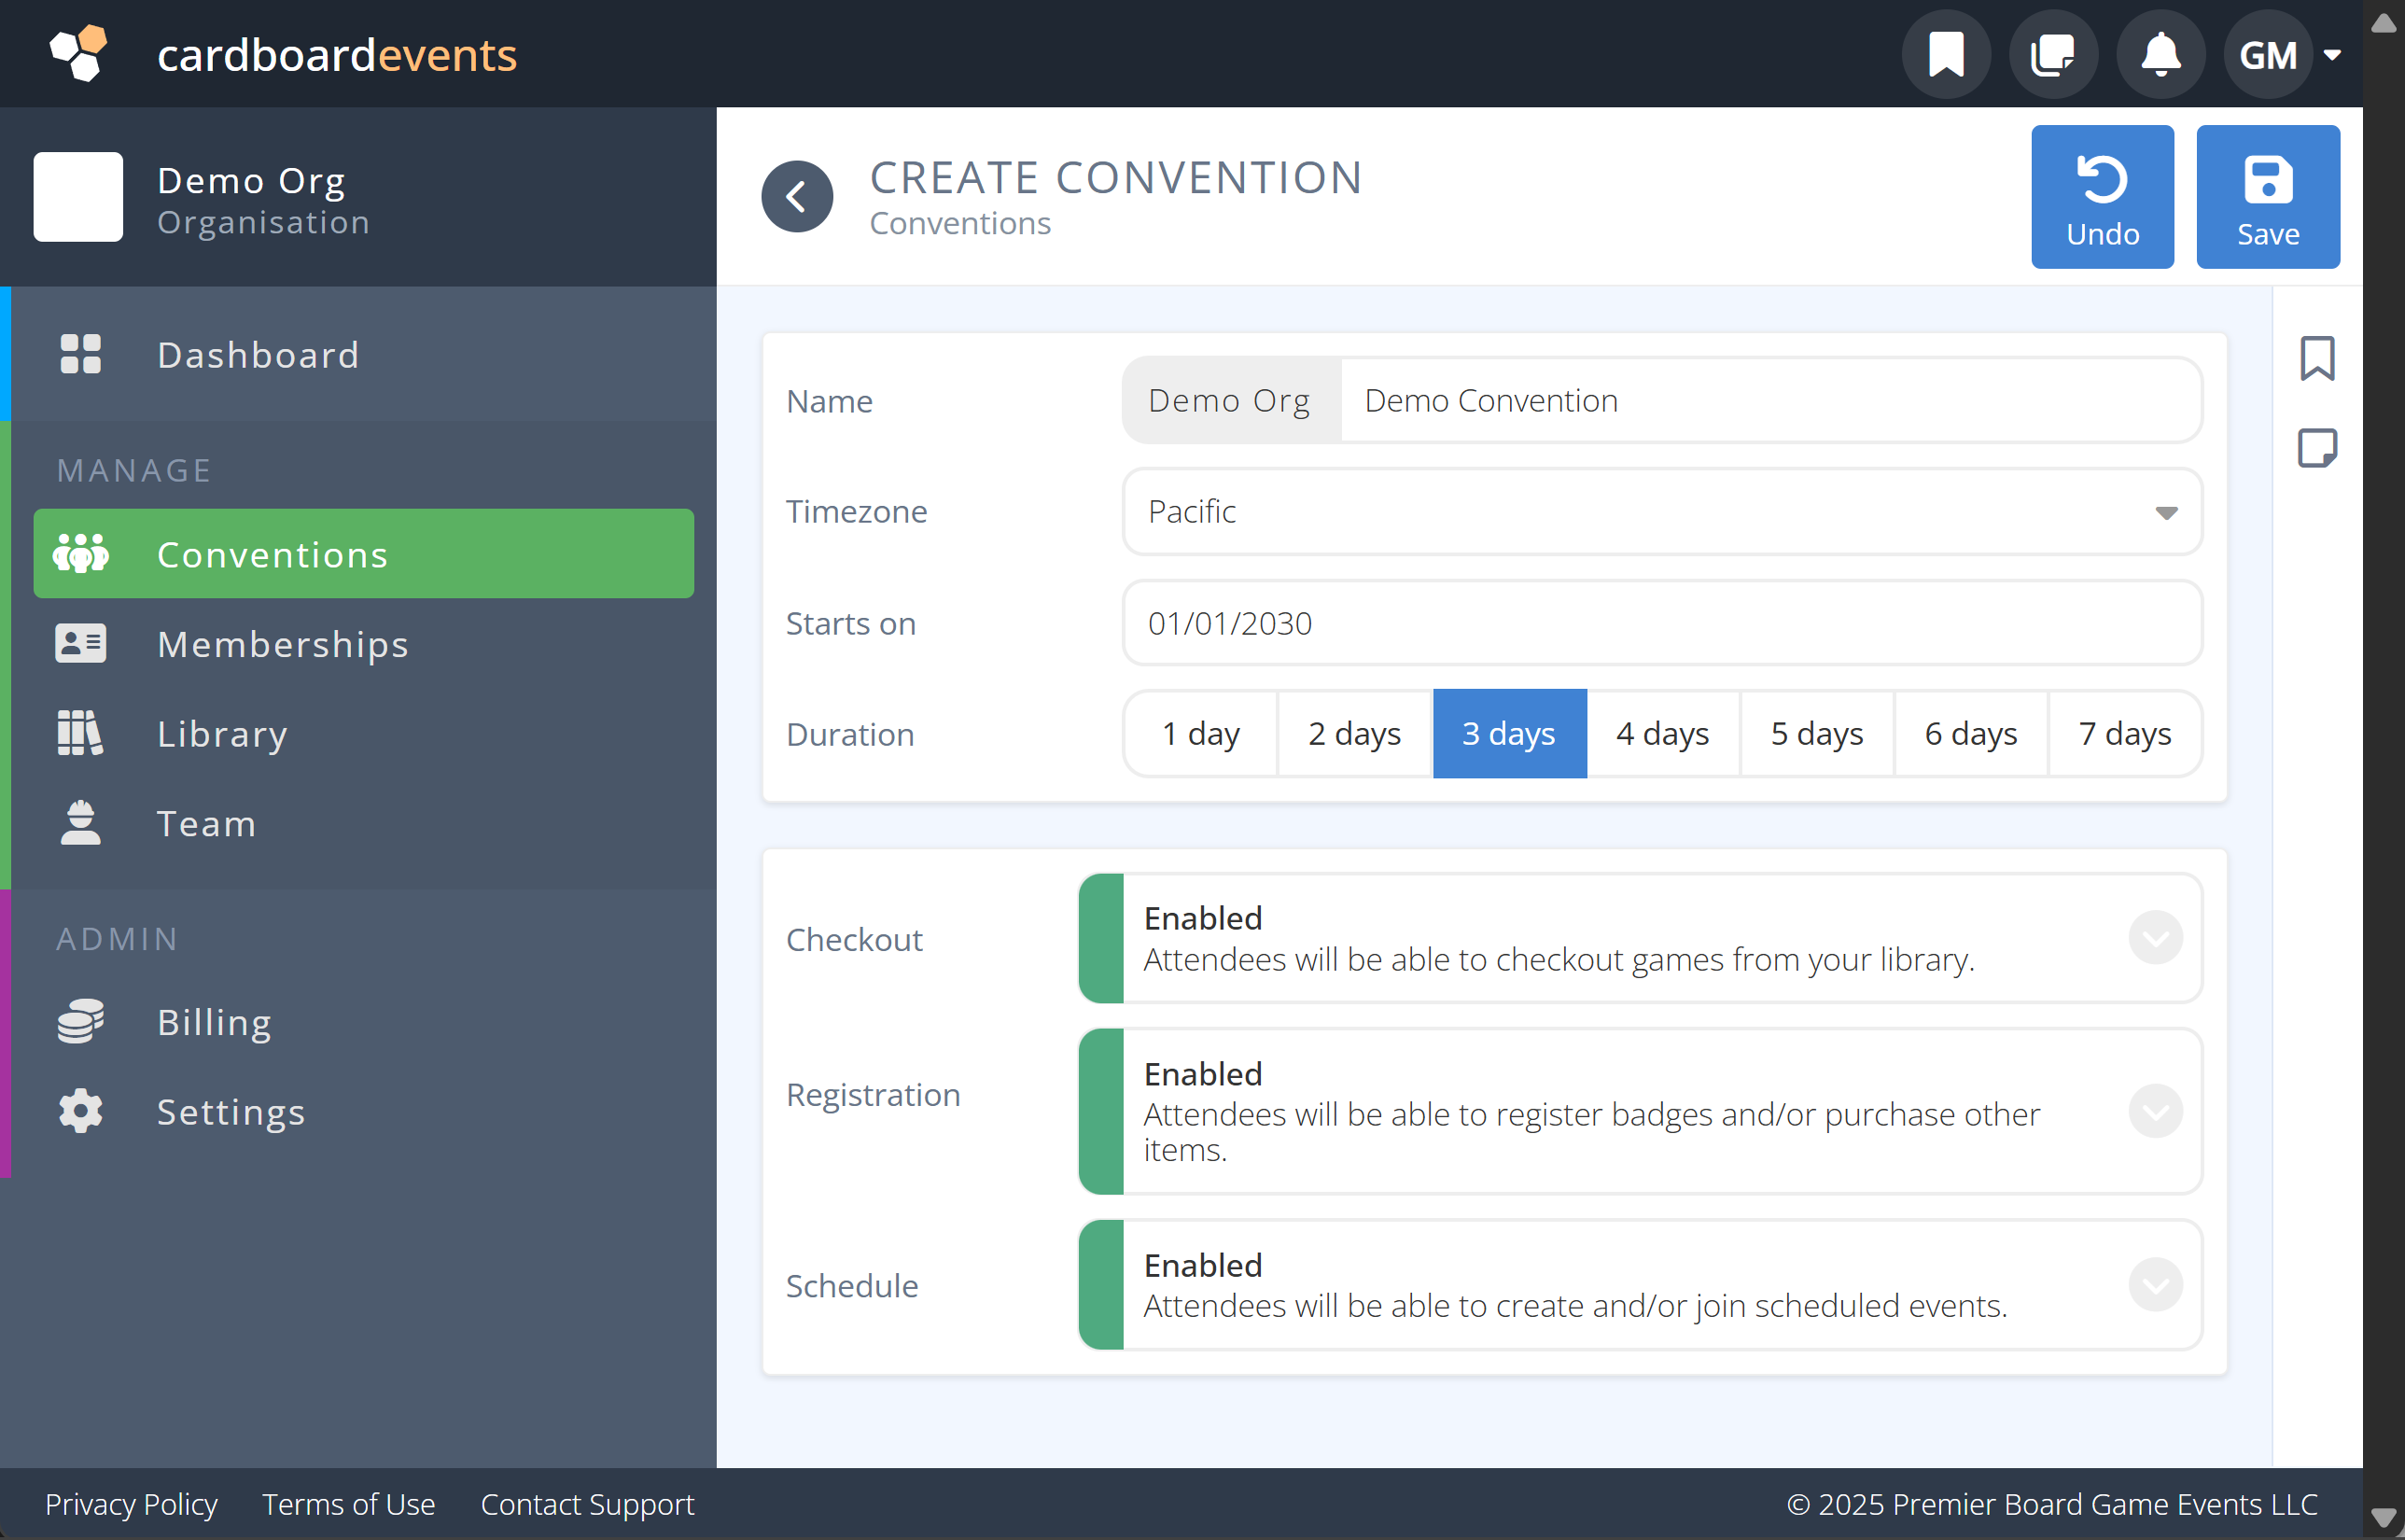
-
Specify the following parameters:
a.Name: The name of your convention Note: This name will be part of your conventions URL address.
b.
Timezone: The timezone where the convention will take place
c.Starts On: The date your convention starts
d.Duration: The lenght of your convention.
e.Template: Blank or Copy if you wish to start from a previous conventions setup
f. Choose the Services you would like from CardboardEvents. -
Click Save
-
Click on the newly created Convention Name.
Full Documentation: Conventions
¶ Create (Badge) Types
The first thing you will need to do for your convention is to create Badge Types. This is the broad category of badges that you want for sale on your registarion page (e.g. Weekend, Friday, Exhibitor, Vendor, etc.). They will be further refined into more specific categories in the next section as Badge Items.
From the Selected Convention:
- Click Attendees
- Under the Setup tab click Types
- Click Create on the top right of the screen.
- Specify the following parameters:
Click each tab to see the information of the corresponding section:
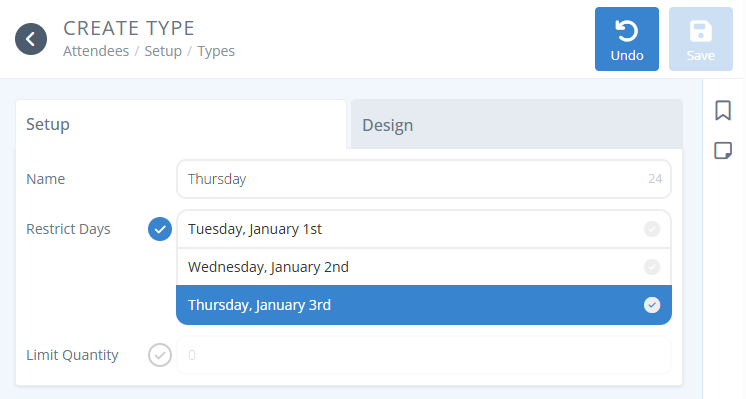
a. 
Name: Name your badge type (e.g. Weekend, Friday, Exhibitor, etc.).
b. Restrict Days: To restrict the days the badge type is valid for click the Restrict Days and click on each day it is valid for. The default is that it is valid for all days.
c. Limit Quantity: To limit the number of this badge type available for purchase click Limit Quantity and enter the total number of badges of this type that may be purchased.
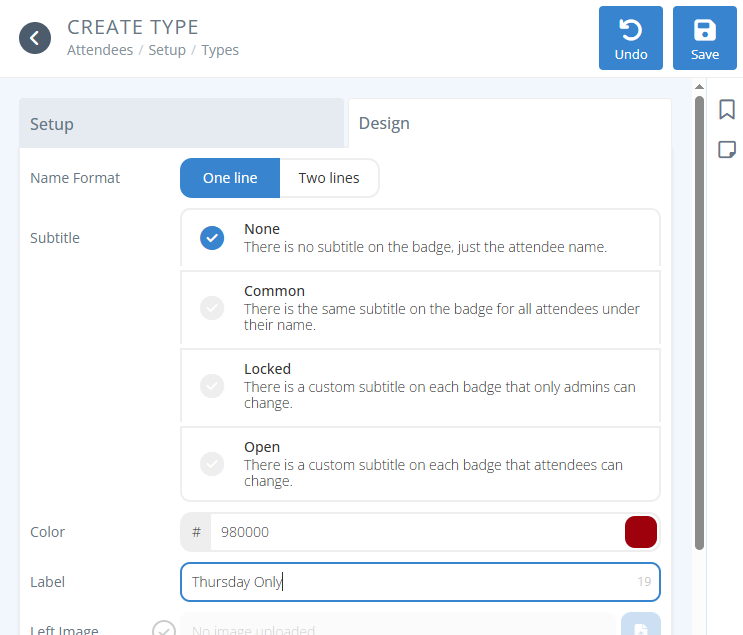
d. Name Format:: Select one line if you want the first and last name on the same line and the same size. Select two lines if you want the first name on the top line (larger and bold) and the last name on the bottom line.
e. Subtitle: Add an optional additional subtitle line on the badge type. See the link for further explanations. https://cardboardevents.featurebase.app/changelog/badge-subtitles-2
f. Color: Select the color palette on the far right. → Select the color you want the bar to be for this badge type. This will be the color of the bar on the bottom of the badge.
g. Label: Enter the text that you want to display inside the color bar for this badge type . (e.g. Weekend, Staff, Exhibitor).
h. Left Image: Upload an optional image that you want to display on the top left corner for this badge type only.
i. Center Image: Upload an optional image that you want to display on the top center for this badge type only.
j. Right Image: Upload an optional image that you want to display on the top right corner for this badge type only.
A sample badge showing a left, center, and right image with an assigned category and subtitle
![]()
-
Click Save.
-
Repeat steps 3-6 for each Badge Type that you want to create.You should create all badge types that are for sale at the start of Registration now, but can always come back later to add more. Our focus is getting the page up and running quickly.
Tip: Some conventions have done well by creating an Admin Exhibitor/Vendor badge.
If you wish to restrict access to booths, exhibitor add-ons, etc to only specific exhibitors or company coordinators, read on. If you want to allow all exhibitor badges to have this access this section may be less helpful.
The convention can restrict permissions for that badge type only to see and buy exhibitor-related items like exhibitor booths, exhibitor badges, ads, sponsorships items, or whatever you deem to ONLY be for their eyes when logged in to the attendee side of the software.
You can also create an badge category with the exhibitor's name that is assigned to all badges from that vendor so the company name shows on the badge.
An ADMIN-type badge can be given to the person who will be responsible for buying stuff on the company's behalf. If you manually create their badge you can set it as pending until they purchase a regular exhibitor badge, a booth that comes with a badge, or any other item. At that point their badge is set to be active.
That person, the ADMIN for the company, will be responsible for managing the badges for their company. They can either
a) do nothing and leave any badges they purchase UNASSIGNED. In this case, any badges they buy will be generic with the company's name only.
b) Modify the name(s) on the badges for who holds them
c) Transfer the badge to the person's company email address.
In cases a) and b) above, the badges will not gain access to the attendee side of the system since no new emails are connect to the badges and will not be able to sign up for events, or purchase items in the stores.
In case c), the new person would have full access to the attendee side of the system like everyone else. It is completely up to the ADMIN badge to decide what they want to do with their company's badges.
Full Documentation: Types
¶ Create Sales Items For Badges
The second thing you need to do is to create the more refined Sales Items for your badge types.. A reminder that these are modifiers for the overall badge type. (e.g. Weekend Adult Early Bird, Weekend Child, etc.). In most cases you know you need a new item if it is the same Type of badge, but with a different price. All other items including generic tickets, add-ons like merchandise, and charges can be created and added later as that is not coveed in the Quick Setup Guide.
From the selected Convention:
- Click Sales.
- Under Setup, Click Items.
- Click Create in the top right of the screen.
- Specify the following parameters:
Click on each tab for details of that corresponding tab on the site.

a. Name: Name your Badge.
b. Status: Click Active as this badge should be available now.
c. Type: Click Badge.
d. Badge: Click on the search box to select the badge Type created above. For longer lists start typing the name of the Type to filter the list.
e. Upgrade: Ignore this for now. It is used to change a badge from one type to another which is not covered here.
f. Description: Enter the description you want your attendees to see about this badge.
g. Image: Upload an optional image for your item to be displayed in any store.

h. Eligibility: Click All badge types.
i. Available From: Leave this unchecked.
j. Available Until: If you want this badge to stop being available on a certain day/time click Availble Until and enter the day and time or use the calendar selector for easier selection.
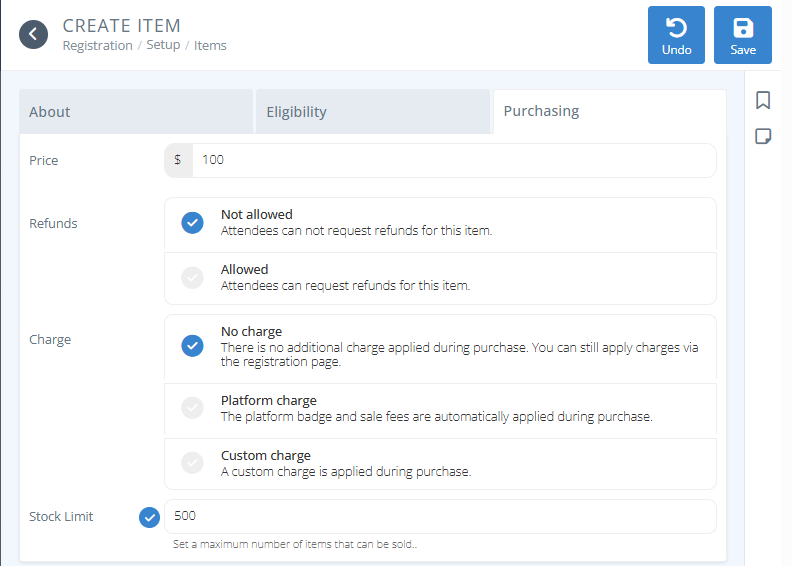
k. Price: Enter the price you want this specific item to be.
l. Refunds: Specify how refunds will be handled.
→ Not allowed - Refunds may not be processed automatically for this item.
→ Allowed - Select this option if refunds may be processed automatically for this item
→→→ Percent - Enter the percentage that the attendee will receive back when refunded.
→→→ Deadline - If you wish to set a date after which refunds will not be processed click Deadline and enter the date and time or use the calendar selector for easier selection.
m. Charge: Specify how your processing fees will be handled.
→ No Charge: No charge is added to the price of the badge.
→ Platform Charge: CardboardEvents Badge & Sales fees are automatically added to the price of the badge and shown to the purchaser.
→ Custom Charge: Apply a custom charge to each badge.
→→→ Fixed charge Add a fixed dollar amount to the cost of the badge. Enter the charge in the Amount field.
→→→ Percentage charge Add a percentage of the badge price to the cost of the badge. Enter the percentage in the Amount field.
s. Stock Limit: To limit the quantity of this item available click on Stock Limit and enter the maximum number of this item available.
-
Click Save.
-
A new section will appear on the bottom of the item labeled COMPS. This will allow you to add comped item(s) to anyone who purchases this item. The item must be created first and this process is covered in the full documentation.
-
Repeat steps 3-6 for each badge item you want to offer on the registration page when it opens.. The process is similar for processing fees, add-ons, and tickets, but is covered in the full documentation.
Full Documentation: Items
¶ Create Main Registration Landing Page
You now have badge Types and Items ready for sale. The next step is to create your main registration landing page. We recommend you keep this as simple and clean as possible for your attendees. Once created you can provide the link to others via social media and your website to register and purchase badges.
From the selected Convention
-
Under the Other section Click Pages
-
Click the Browse menu item
-
Click +/Create button in the actions area of the screen (top right).
-
Specify the following parameters:
![]()
a. Name: Name your landing page (e.g. Main Registration). This will be included in the URL for your registration page.
b. Status: Click Enabled to start accepting registrations.
c. Site: Click Register to create a registration page.
d. Type: Click Register Badge to set the page type to allow registration and purchase of badges and add-ons.
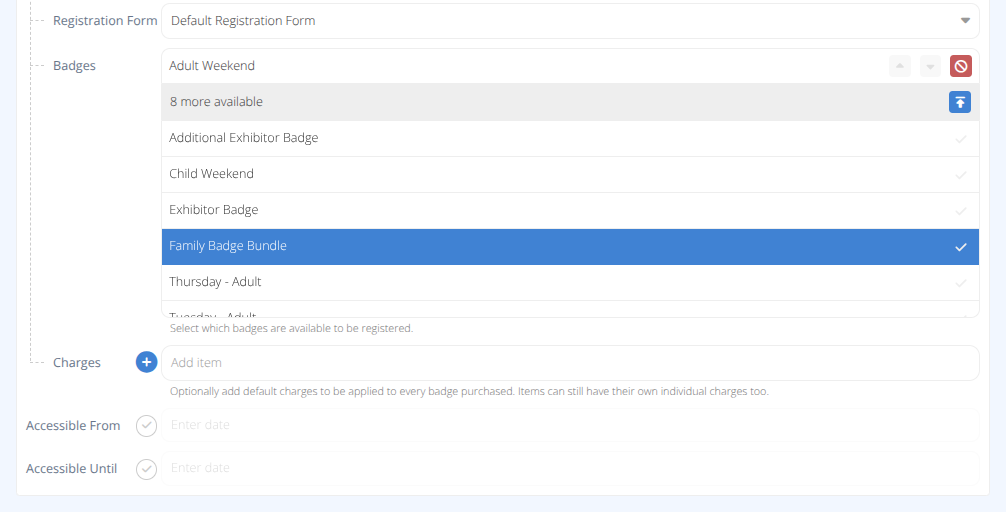
e. Registration Form: Select the Default Badge Registration Form
f. Badges: Select which badges are available from this registration page. You can re-order the badges using the up and down arrows, but after creation you can also group badges if you have a lot of different types (e.g. Weekend Badges, Day Badges, Child Badges, etc..
e. Charges: Leave blank for now, if you wish to add additional charges for each badge purchased badge you must create Items first for the charge and then add it here.
f. Accessible From: Leave this blank to allow registration immediately, otherwise select the field and set the date to when registration opens.
g. Accessible To: Typically this is set to the end date of your convention. If left blank this registration page will remain accessible indefinately.
- Click Save.
https:register.cardboardevents.com/org-name/convention-name/URL
By default the URL is created from the Name provided to the page.
The Default Badge Registration Form contains inputs to collect First Name, Last Name, and E-mail of the badge holder. This can be modified, but in the quick setup you are now ready to sell badges.
Your page has been created and new fields are now available for editing:
- You can further edit your page to add additional information, images, and details. If you wish to collect additional information from badgeholders you'll need to edit the Default Registration Form or create a custom form. How you customize your registration page is up to you.
Click the tabs below to see each tab of the Page details screen.
![]()
After saving the initial page data the following fields can no longer be edited due to differences in page types:
a. Site
b. Type
The following new field(s) appear after saving and can now be modified:
a. URL - Adjust the URL used to visit this registration web page.
This tab lets you set a background image and countdown and closed messages:
![]()
a. Background Image - This image will appear in the header of the registration page as a faded image. The visible portion of the image will be determined by the size of the web browser being used and will be centered. We recommend a minimum image size of 600x600 pixels.
b. Countdown Message - This field is required only if Available From is selected in the Setup Tab. The entered message will display as long as the current date is earlier than the Available From date.
c. Closed Message - This field is required only if Available Until is selected in the Setup Tab. The entered message will display as long as the current date is later than the Available Until date.
This is where you will customize the look of your registration page. You can add additional Content Blocks (e.g. Images, Maps, Text, etc.) using the +/Add button on the Content Tab.
You can edit current blocks including the Add Badge block by hovering over the the block and selecting the (Edit block).
To reorder blocks use the up and down arrows on the content blocks. To delete blocks hover over the block and click the Delete block button.
![]()
If you want to group badges, reorder groups or badges, limit purchases, or restrict which badges are for sale hover over the Your Badges content block and click on the 🖉(Edit block) icon. By default it uses the Default Registration Form and has no groups defined or purchase limitations.
![]()
You can customize your registration completed message using the Completed sub-tab under the Content tab.
- Click Save to save any of your changes.
Full Documentation: Pages
¶ Explore and Customize your Convention
Congratulations! Your convention's registration is open and you are ready to sell badges!
Moving forward, explore the different menus and use the full help system to find more information on what to do. CardboardEvents offers a lot of features and functionality and is under continuous devleopment.
You might decide to not use all of the features on your first convention and slowly add additional components, or you might dive in and go all on board. The choice is yours.
You can now start exploring the different menus at your own pace. There will be plenty of time to set up the rooms, spaces, lobbies, schedules, contests, play to wins, volunteers, exhibitors, advertising, sponsorships and other things needed for your convention in the months leading up to it. CardboardEvents is honored to partner with you in making your next convention the best it can be.
If you run into any problems do not hesitate to reach out for additional support