¶ Types
¶ Oveview
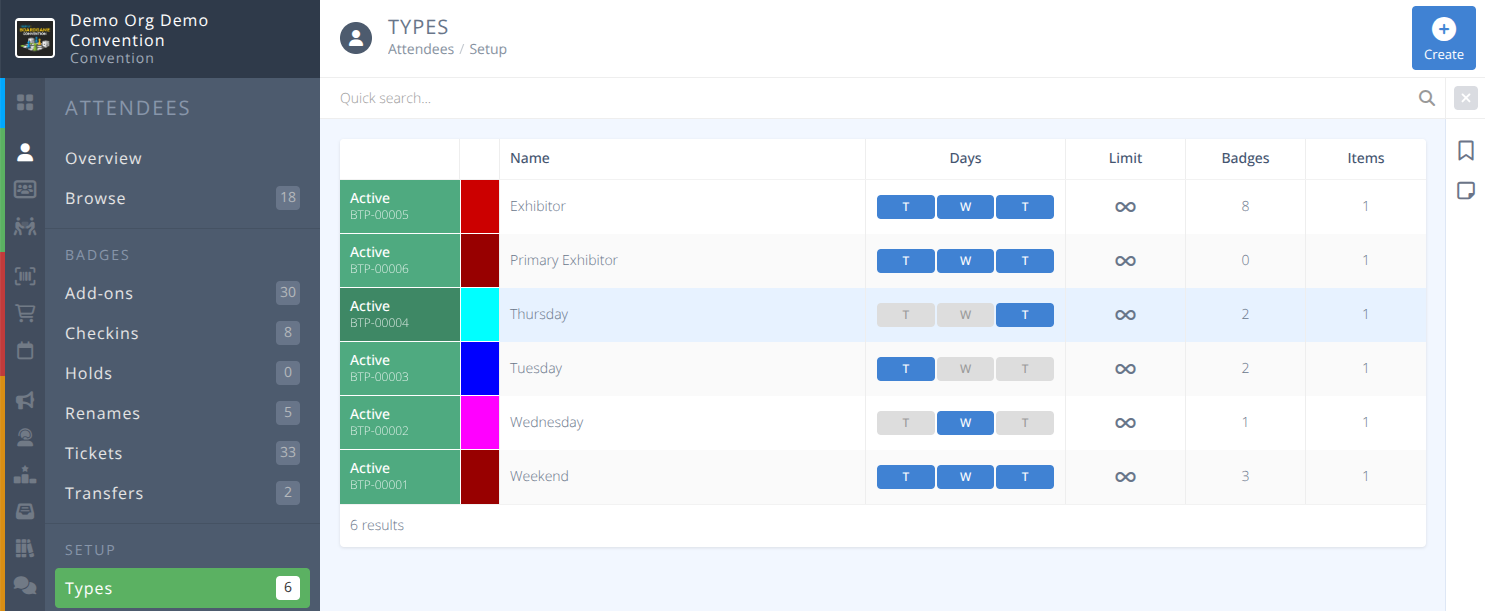
Creating badge types is a critical step for your convention. Each badge type that you will have at the convention will need to be created here first before a badge item can be created and sold for each (e.g. Full, Weekend, Exhibitor, Staff, etc.). They will be further refined into more specific sales items in the Sales menu.
Note: You can have multiple Badge Items for each Badge Type (e.g. Weekend Adult Early Bird, Weekend Child, etc.)
¶ Common Procedures
Create a Badge TypeModify a Badge TypeDelete a Badge TypeCreate a Sales (Badge) Item- Redirects to the Sales documentation
¶ Fields

Click each tab to see the information of the corresponding section:
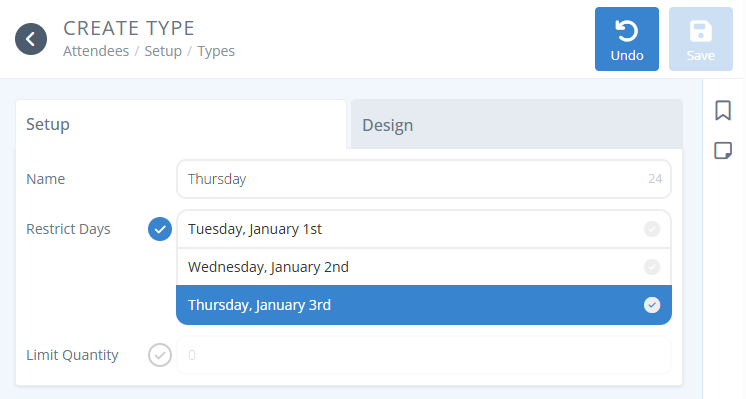

Name- The internal name of your badge type (e.g. Weekend, Five Day, Exhibitor, etc.)Restrict Days- Select this checkbox and then the corresponding days that the badge is valid forLimit Quantity- The maximum number of this badge type (Default: Unlimited)
-
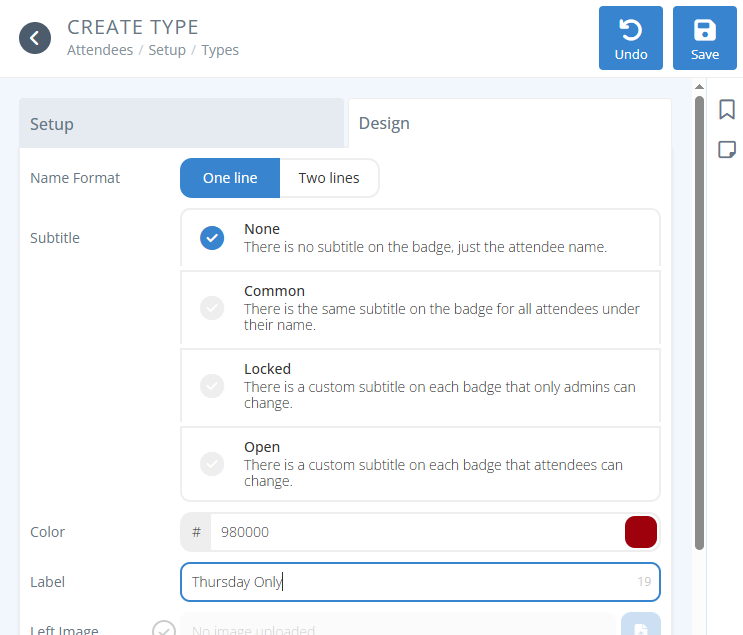
Name Format- The way the attendee's name is displayed on the badge, either:- One Line - The first and last name appear on the same line in the same size font
- Two Line - The first name appears in a larger font above the last name
-
Subtitle- An optional field for attendees to display additional information (Feature Release Notes), either:- None - No subtitle is included on the badge
- Common - The same subtitle appears for all attendees under their name.
Label- A user friendly name to reflect what the subtitle is forDefault- The default value of the subtitle
- Locked - A custom subtitle appears on each badge of this type, that can only be changed by an admin
Label- A user friendly name to reflect what the subtitle is forSource- Where the value of the subtitle originates from, either:- Blank - The subtitle is blank unless otherwise changed
- Default Value - The subtitle has a common defaul value that can be changed
- Data Capture - The subtitle is populated from data captured during registration
- Open - There is a custom subtitle on each badge that attendees can be change
Label- A user friendly name to reflect what the subtitle is forGuidance- Text that will be displayed to attendees to help them change their subtitleSource- Where the value of the subtitle originates from, either:- Blank - The subtitle is blank unless otherwise changed
- Default Value - The subtitle has a common defaul value that can be changed
- Data Capture - The subtitle is populated from data captured during registration
-
Color- The solid colored bar on the bottom of each badge of this type. Either enter the hex value of the color desired or use the color picker on the far right of the field to select a color. -
Label- The text that appears on top of the colored bar on the bottom of each badge of this type. Left Image- The image that appears in the top left corner of the badgeCenter Image- The image that appears in the top center of the badgeRight Image- The image that appears in the top right of the badge
¶ Sample Badge
A sample one-line format badge showing a left, center, and right image with an assigned category and subtitle
![]()
¶ Procedures
¶ Create a Badge Type
-
From the Menu click
-
Click in the actions area
-
Specify the following parameters in the Setup tab:
a. Name: Name your badge type (e.g. Weekend, Five Day, Exhibitor, etc.).
b. Restrict Days: If you want the badge to have Full Access, then don’t click the checkbox, If you want to restrict the days the badge is good for, then click the checkbox and select the days you want your badge to be good for (e.g. Weekend: Friday, Saturday and Sunday).
c. Limit Quantity: If you want unlimited badges for this badge type, then do not click the checkbox. If you want to limit the maximum number of badges for this badge type, then click the checkbox and enter the maximum number of badges there will be for this badge type. -
Click on the Design tab
a. Name Format: Select one line if you want the first and last name on one line. Select two lines if you want the first name on the top line and the last name (larger and bold) on the bottom line.
b. Subtitle Add an optional additional subtitle line on the badge type. See theRelease Notesfor more information
c. Color: (solid colored bar on the bottom of each badge type) - Select the color palette on the far right. → Select the color you want the bar to be for this badge type only.
d. Label (text that displays inside of the colored bar): Enter the text that you want to display inside of the color bar for this badge type one. (e.g. Weekend, Staff, Exhibitor).
e. Left Image: Upload an optional image that you want to display on the top left corner for this badge type only.
f. Center Image: Upload an optional image that you want to display on the top center for this badge type only.
g. Right Image: Upload an optional image that you want to display on the top right corner for this badge type only. -
Click .
Sales Itemto sell the badge via registration or in the store
Tip: Some conventions have done well by creating an Admin Exhibitor/Vendor badge.
If you wish to restrict access to booths, exhibitor add-ons, etc to only specific exhibitors or company coordinators, read on.
The convention can restrict permissions for that badge type only to see and buy exhibitor-related items like exhibitor booths, exhibitor badges, ads, sponsorships items, or whatever you deem to ONLY be for their eyes when logged in to the attendee side of the software.
You can also create an badge category with the exhibitor's name that is assigned to all badges from that vendor so the company name shows on the badge.
An ADMIN-type badge can be given to the person who will be responsible for buying stuff on the company's behalf. If you manually create their badge you can set it as pending until they purchase a regular exhibitor badge, a booth that comes with a badge, or any other item. At that point their badge is set to be active.
That person, the ADMIN for the company, will be responsible for managing the badges for their company. They can either
a) do nothing and leave any badges they purchase UNASSIGNED. In this case, any badges they buy will be generic with the company's name only.
b) Modify the name(s) on the badges for who holds them
c) Transfer the badge to the person's company email address.
In cases a) and b) above, the badges will not gain access to the attendee side of the system since no new emails are connect to the badges and will not be able to sign up for events, or purchase items in the stores.
In case c), the new person would have full access to the attendee side of the system like everyone else. It is completely up to the ADMIN badge to decide what they want to do with their company's badges.