¶ Pages
¶ Overview
Pages is a flexible subsystem to allow you to create registration and informational pages.
My pages created here will display in the Information tab on the attendee side of the software (my.cardboardevents.com).
Register pages are how your volunteers, vendors, and publishers apply to attend your convention and how your attendees purchase badges.
Note: To create registration and application pages a Form is required first. Default forms can be used or inputs can be customized.
¶ Menu Breakdown
¶ Browse - Browse Pages and create and edit them
¶ Setup - TBD
Common Blocks- TBD
¶ Admin - Administration of the Pages Section
¶ Common Procedures
Since Pages are so flexible we will go over the basics for three main types of pages (registration, information, and application).
Additional Details will be provided on Content Blocks towards the end of this page.
¶ Fields
Due to the flexibility of Pages the fields will vary depending on Site and Type
Select the Tab based on the Page Site:
![]()
-

Name- The Name of the page.
Note: It is recommended to keep page names generic and not include any date references to allow for easier cloning for future conventions. -
Status- The status of the page, either:- Enabled - The page is viewable by users.
- Disabled - The page is not viewable by users.
-
Site- For this example this is set to Register. All Pages will be connected to registration.- Register - The Page is connected to registration. This Tab
- My - The Page is used for sharing information.
-
Type- Register Badge - Registration and Badge Purchase.
Charges- Add Sales Items of Type Charge that are added to every badge purchased.
- Data Capture - Capture data from a form
(e.g. Sponsor Sign-up). - Information - Share information related to Registration
(e.g. Parking). - Third Party - Sale of items without need a badge or account
(e.g. Sponsorship or Advertising)Charges- Add Sales Items of Type Charge that are added to every item purchased.
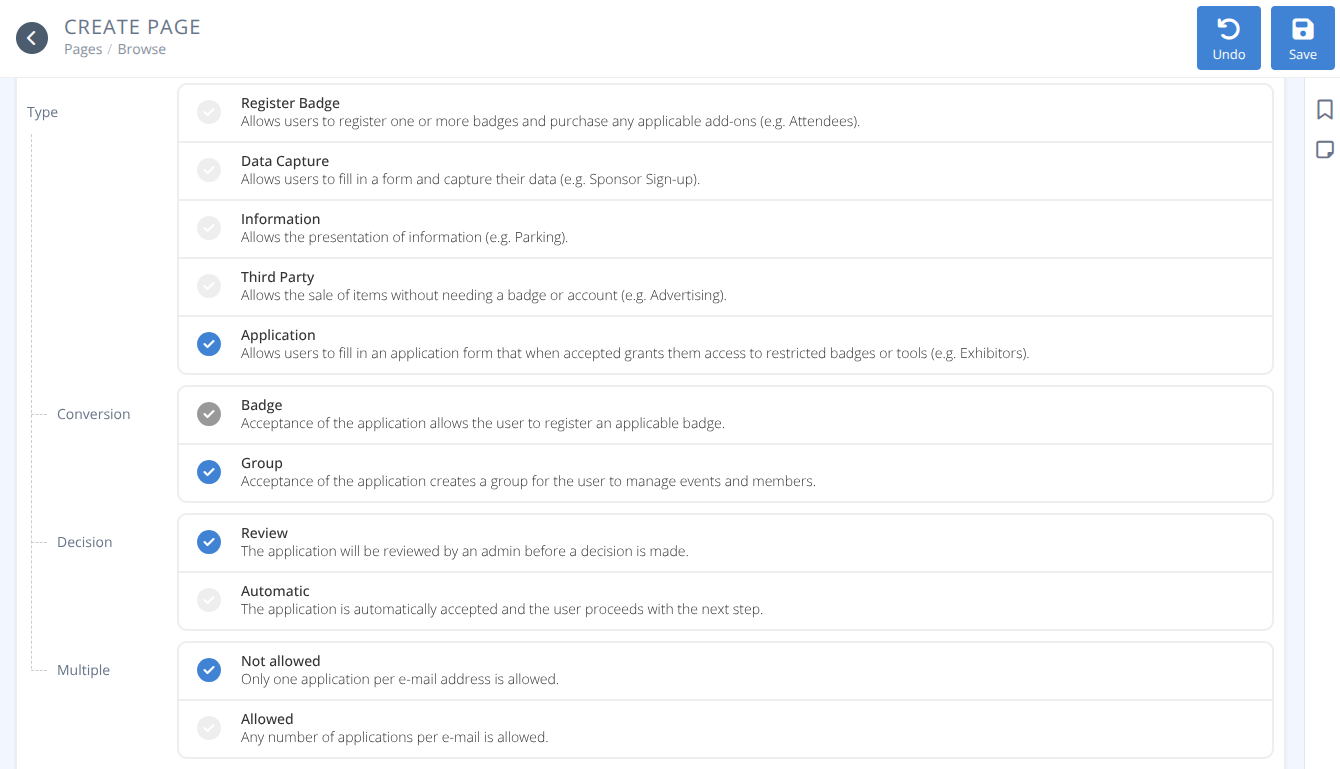
- Application - Users fill in an application form that if granted provides access to restricted badges and tools
(e.g. Exhibitors and Special Groups)-
Conversion- Required whenTypeis Application. When the application is approved the result is one of:- Badge - Acceptance of the application allows the user to register for a badge.
- Group - Acceptance of the application creates a group for the user to manage.
-
Multiple- Required whenTypeis Application.- Not allowed - Only one application per e-mail address is allowed.
- Allowed - Any number of applications may be submitted per e-mail address.
- Register Badge - Registration and Badge Purchase.
-
Accessible From- This page is accessible starting at this day and time. -
Accessible Until- This page is no longer accessible after this day and time.
-
Name- The Name of the page. -
Status- The status of the page, either:- Enabled - The page is viewable by users.
- Disabled - The page is not viewable by users.
-
Site- For this example this is set to Register. All Pages will be connected to registration.- Register - The Page is connected to registration.
- My - The Page is used for sharing information. This Tab
-
Type- Data Capture - Capture data from a form
(e.g. Sponsor Sign-up). - Information - Share information related to Registration
(e.g. Parking). - Redirect - Redirects user to another URL
(e.g. Organization Website)-
Redirect To- Required if type is Redirect. The full URL of the site to go to.
(e.g. https://cardboardevents.com)
- Data Capture - Capture data from a form
-
Visibility- Who can see the page either:- Everyone - Anyone can see the page, including those without a badge.
- Restricted - Only specific types of users can see the page. Either:
- Badge Holders - Users with a badge can see the page.
- Group Members - Users in a group can see the page.
- Public Users - Users not part of the convention can see the page.
-
Accessible From- This page is accessible starting at this day and time. -
Accessible Until- This page is no longer accessible after this day and time.
¶ Browse
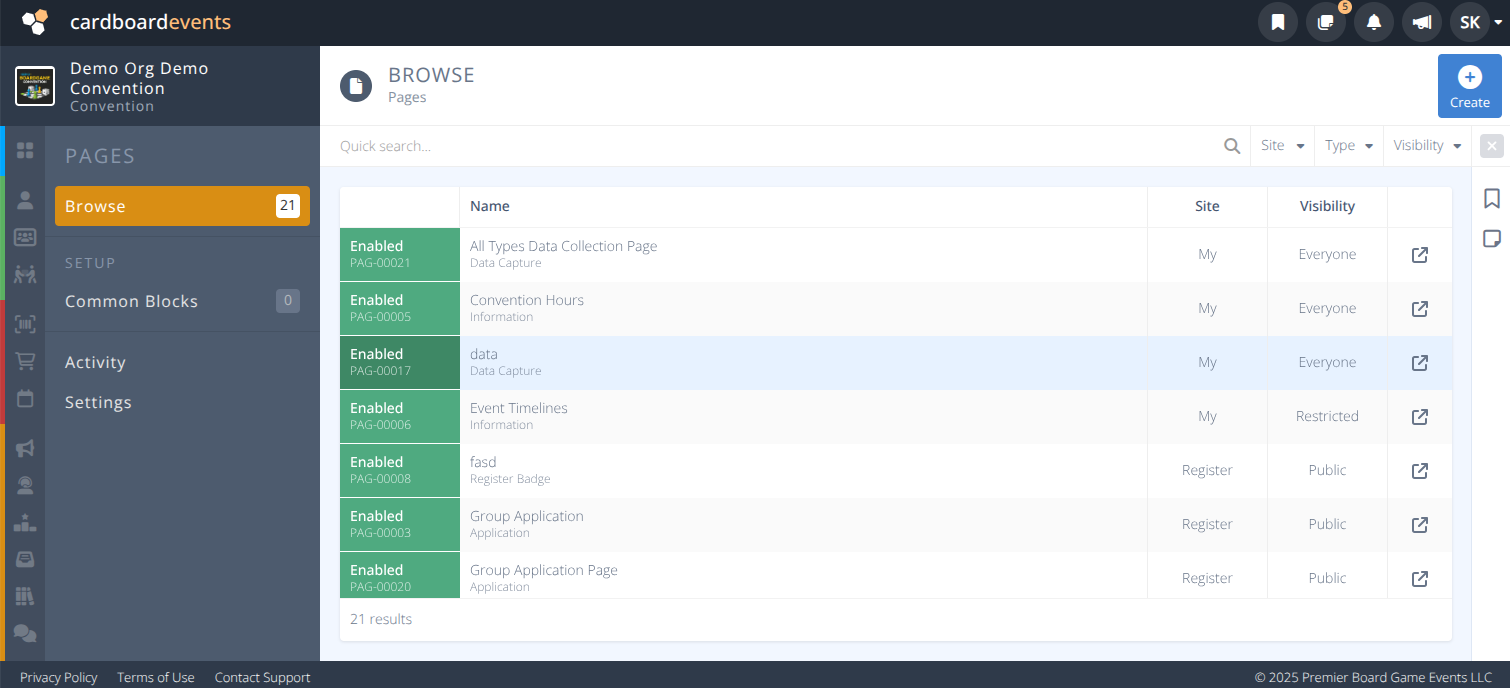
Click the Browse Menu to view the grid of all existing pages.
Selecting a row will display the details of that page.
As with all of the grids the quick search and filter options are shown above the grid. Select any option to filter the view to those records. Click the x to clear any filters set.
¶ Procedures
Most procedures for creating pages are very similar, but to aid in creation, 3 specific examples are provided (registration, information, and application).
Content Blocks are detailed at the bottom of this page.
¶ Create a Badge Registration Page
- Under the Browse page click +/Create at the top right of the screen.
![]()
-
Enter the Name of the Page
(e.g. "Main Registration")
Note: It is recommended to keep page names generic and not include any date references to allow for easier cloning for future conventions. -
Click Enabled for the
Status. -
Click Register for the
Site. -
Click Register Badge for the
Type. -
Click +(Charges) to search for and add any default Charges for the registration
(e.g. "Processing Fees").
-
To open registration on a specific date click the Accessible From ✓⃝ and select or enter the date and time of registration
e.g.) MM/DD/YYYY HH:MM AM/PM -
To close registration on a specific date click the Accessible Until ✓⃝ and select or enter the date and time of registration
e.g.) MM/DD/YYYY HH:MM AM/PM -
Click Save
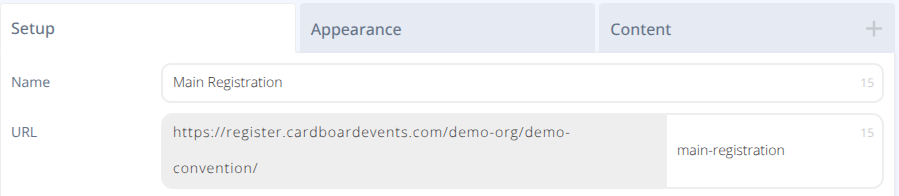
- Confirm the
URLis what you would like and modify if necessary.
Note: It is recommended to keep page URLs generic and not include any date references to allow for easier cloning for future conventions.
-
Click the Appearance Tab.
-
If wanted, upload a
Background Image. -
If
Accessible Fromwas selected, enter the Countdown Message
e.g.) "Sales start soon!" -
If
Accessible Untilwas selected, enter the Closed Message
e.g.) "Sales are closed. See you next year!"
-
Click the Content Tab.
-
To set which data to collect, purchase limitations, which badges are accessible from this registration page, and group badges as needed. Click the 🖉(Edit Block) icon on Your Badges.
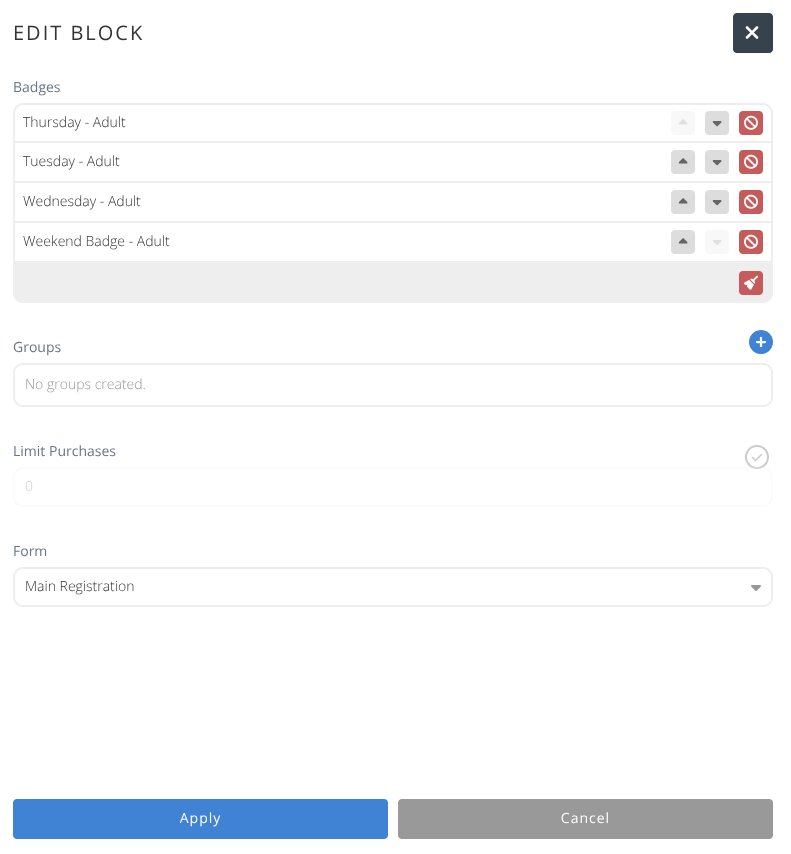
a. To Restrict the badges shown in the content block select those to show (if none are selected all will show).
Note: Badges withAvailable fromandAvailable untildates will only show if the current date is in range, even if selected.
b. To limit purchases click the Limit Purchases ✓⃝ and enter the number of badges that can be purchased during each registration.
c. Select the Form that is used to collect data during the registration. By default it is set to the Default Registration Form
-
Click Apply.
-
Click Save.
¶ Create an Information Page
- Under the Browse page click +/Create at the top right of the screen.
-
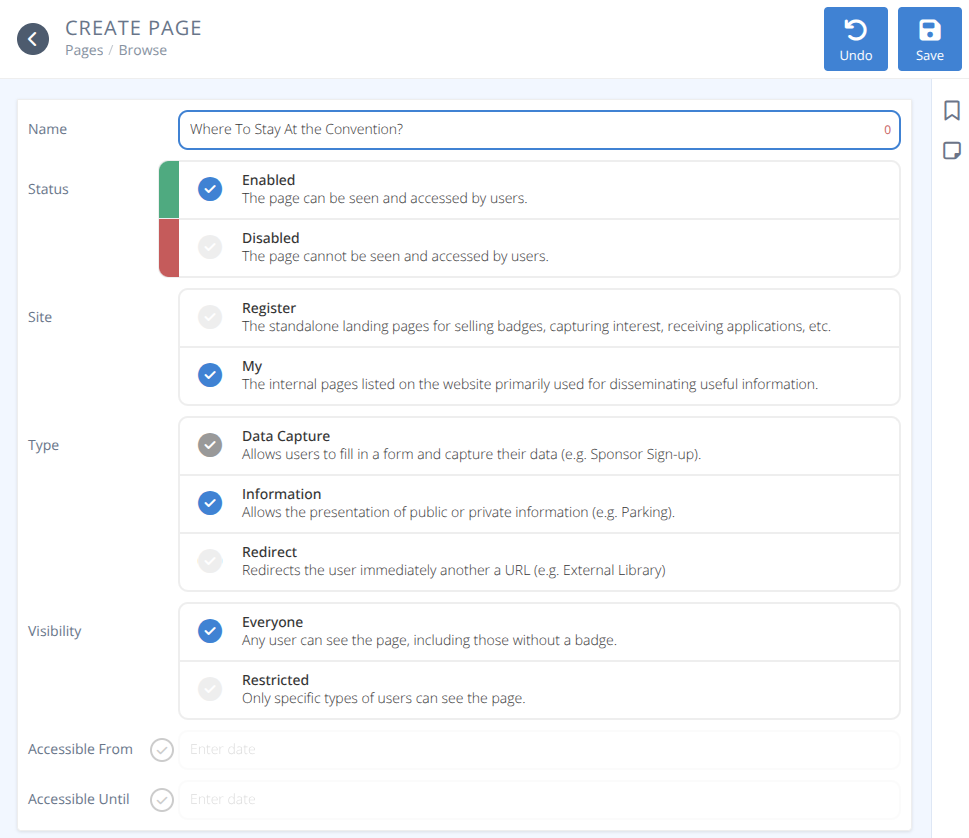
Enter the Name of the Page
(e.g. "Where to Stay At the Convention") -
Click Enabled for the
Status. -
Click My for the
Site. -
Click Information for the
Type. -
Set the
Visibilityto either Everyone or Restricted
a. If theVisibilityis Restricted set theSpecifyto the chosen category.
-
To show this page only after a specific date and time click the Accessible From ✓⃝ and select or enter the date and time of registration
e.g.) MM/DD/YYYY HH:MM AM/PM -
To hide this page after a specific date and time click the Accessible Until ✓⃝ and select or enter the date and time of registration
e.g.) MM/DD/YYYY HH:MM AM/PM -
Click Save
-
Confirm the
URLis what you would like and modify if necessary.
-
Click the Appearance Tab.
-
Enter a Title that will be shown on the index page.
-
Enter a List Summary that is a brief description shown on the index page.
-
If desired upload a List Image icon that will show before the title on the index page.
-
If
Accessible Fromwas selected, enter the Countdown Message
e.g.) "Sales start soon!" -
If
Accessible Untilwas selected, enter the Closed Message
e.g.) "Sales are closed. See you next year!"
-
Click the Content Tab.
-
Click +(Add Block) on the Content Tab
-
Add, configure, and reorder blocks as you wish. Refer to the Content Blocks documentation for details on content blocks.
-
Click Save.
¶ Create a Group Application Page
- Under the Browse page click +/Create at the top right of the screen.
-
Enter the Name of the Page (e.g. Group Aplication)
-
Click Enabled for the
Status. -
Click Register for the
Site. -
Click Application for the
Type. -
Set
Conversionto Group
Conversion to a Badge is more useful for smaller entities such as some vendors.
-
Set
Decisionto Review. If you would rather anyone with the application link can create a group automatically this should be set to Automatic -
Set
Multipleto Not allowed. In some situations you may want a single email to have multiple groups, but this is usually not the case.
-
To show this page only after a specific date and time click the Accessible From ✓⃝ and select or enter the date and time of registration
e.g.) MM/DD/YYYY HH:MM AM/PM -
To hide this page after a specific date and time click the Accessible Until ✓⃝ and select or enter the date and time of registration
e.g.) MM/DD/YYYY HH:MM AM/PM -
Click Save
-
Confirm the
URLis what you would like and modify if necessary.
-
Click the Content Tab.
-
Click +(Add block) on the Content Tab
-
Add, configure, and reorder blocks as you wish. Refer to the Content Blocks documentation for details on content blocks.
We recommend adding, at a minimum, a text box to explain the application process and how groups will be used. -
Click Save.
¶ Content Blocks
| Button | Description and Usage Details | Context Notes |
|---|---|---|
 Add-ons |
Add Any Sales Items of type Add-on to your page to buy during registration. Fields: Title, List of Sales Items. |
Site: Register Type: Register Badge only |
 Banner |
Add a banner image. Size: Focus of image is centered Width: Fill space Height: 240px Recommended Image Size: 1200 x 240px |
All Contexts |
 Big Image |
Add full images. Size: Scaled to show Full Image Max Width: 100% Height: Auto |
All Contexts |
 Featured Link |
Opens supplied link in a new tab. Fields: Title, Description and URL in format: "http(s): //url" |
All Contexts |
 Google Map |
Add an interactive Google Map or Street View. Directions: From Google Maps select Share, Embed a Map, COPY HTML and paste into the Google Map field of this content block. Height: 483 px |
All Contexts |
 Image Gallery |
Tiles several images. Click on an image to display full image including supplied Title and Text. Size: Focus of images are centered Width: 200px Height: 200px Fields: Title, Text (for each image) |
All Contexts |
 Items |
Add Items that are for sale. These items do not require a badge to purchase. | Site: Register Type: Third Party only |
 Schedule |
Add a searchable and interactive schedule restricted to the specified combination of Days, Lobbies, and Rooms Fields: Days, Lobbies, Rooms |
All Contexts |
 Spaces |
Add a generic graphical view of the occupancy of spaces in a room restricted to the specified days. Fields: Room, Days |
All Contexts |
 Text |
Add a block of text. Supports: Bold, Italics, Underline, HyperLinks, Headers, Left and Center alignment. |
All Contexts |
 YouTube Video |
Add an interactive embeded YouTube Video. | All Contexts |