¶ Discounts
¶ Overview
Create and manage conventions discount codes with many options and settings for different approaches. Discounts can be used by attendees when registering, store purchasing, or ticket office purchasing.
The Discounts page shows all codes, including their status, name, code itself, type, and uses/limit. You can search and filter by name, status, and type.
Note: Only one discount code can be used per basket.
There are currently 3 types of discounts and it is important to review how they work before creating a discount code.
-
% discount
This type of discount provides a % off of the item(s) that meet the eligibility criteria that are in the basket regardless of the number of items unless limited by max items. -
$ discount
This type of discount provides up to the specified amount off the basket. Note: The $ discount provides a specific dollar amount off of the bill. If the amount exceeds the price of the eligibility items it will continue to apply the balance to the remainder of the basket.
 -
Comp
This type of discount provides a comped item that is given to the primary badge holder after purchasing. Note: The comped items will appear in a list in the Discount Code section of the invoice once applied and the items will be added to the account of the primary badge on purchase.
During creation the basic setup is done first and then the code may be modified to specify more advanced parameters.

¶ Common Procedures for Discounts
Create a Discount
a.Discount Code for a free item(s) with No Other Purchase Required
b.Discount Code for a % off specific items
c.Discount Code for $ Off a Basket
d.Discount Code for Comped Item(s) With PurchaseDelete a DiscountModify a DiscountWork with Unique Codes
a.Add Unique Codes
b.Grant Unique Code
c.Revoke a Unique Code
d.Delete Unique Code
¶ Fields
¶ Setup Tab
-

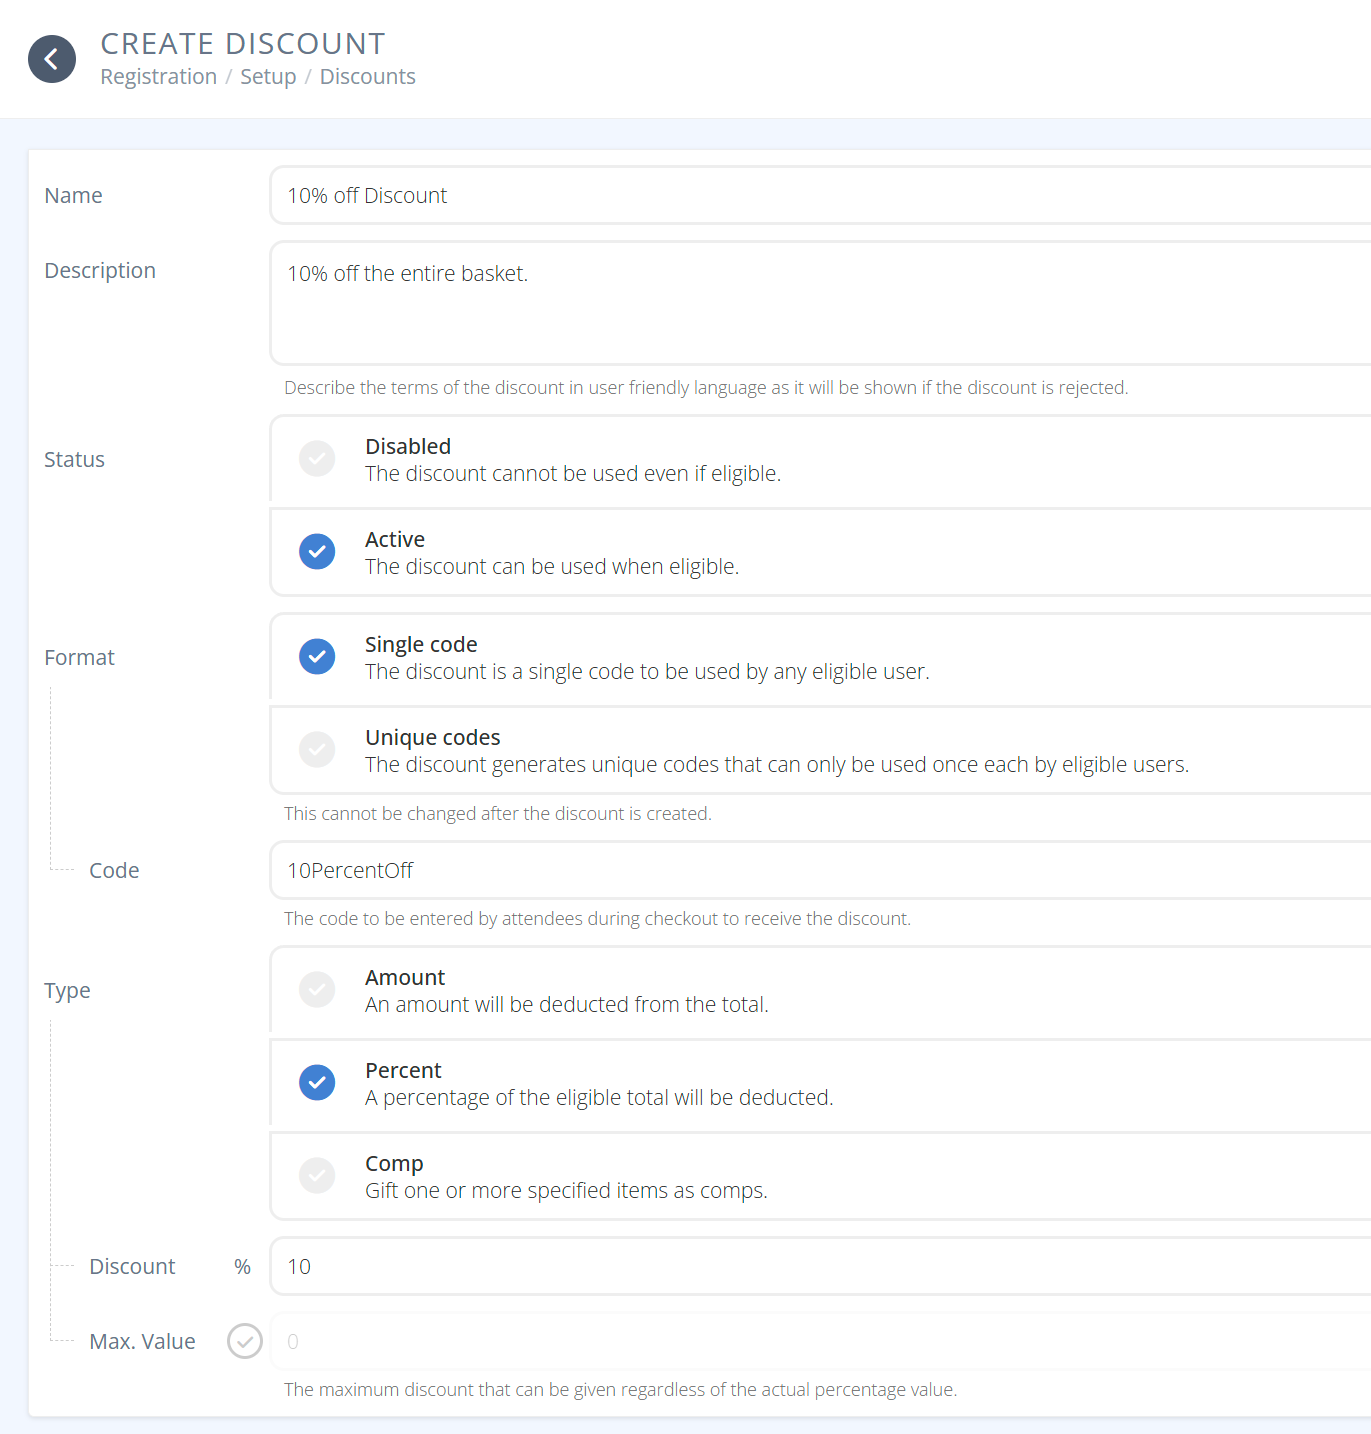
Name: Name your discount (e.g. Full Badge Discount). -
Description: Describe what the discount code is for, what it does and the requirements needed for it to be valid. When the requirements are not met and the code does not apply the description will be shown. -
Status:- Disabled: if you don't want the code to be able to be used.
- Active: if you want the code to be able to be used.
-
Format:- Single Code: - The discount is a single code that can be used by anyone with the code.
- Unique Codes: - The discount generates codes that can only be used one time each by an eligible user. For additional information on one-time use codes refer to the feature page
-
Code: (Single Code Only) The code you want attendees to enter to receive the discount (max of 32 characters). -
Type:- Amount: Discount will be a dollar amount.
- Percent: Discount will be a percentage of the eligible items.
- Comp: Discount will not be a financial discount, but instead the attendee will receive comped item/items when using the code.
-
Discount: (Amount and Percent only) The amount in dollars or percentage of the discount. -
Max Value: (Percent only) The maximum dollar amount of the discount. Default is no maximum value.
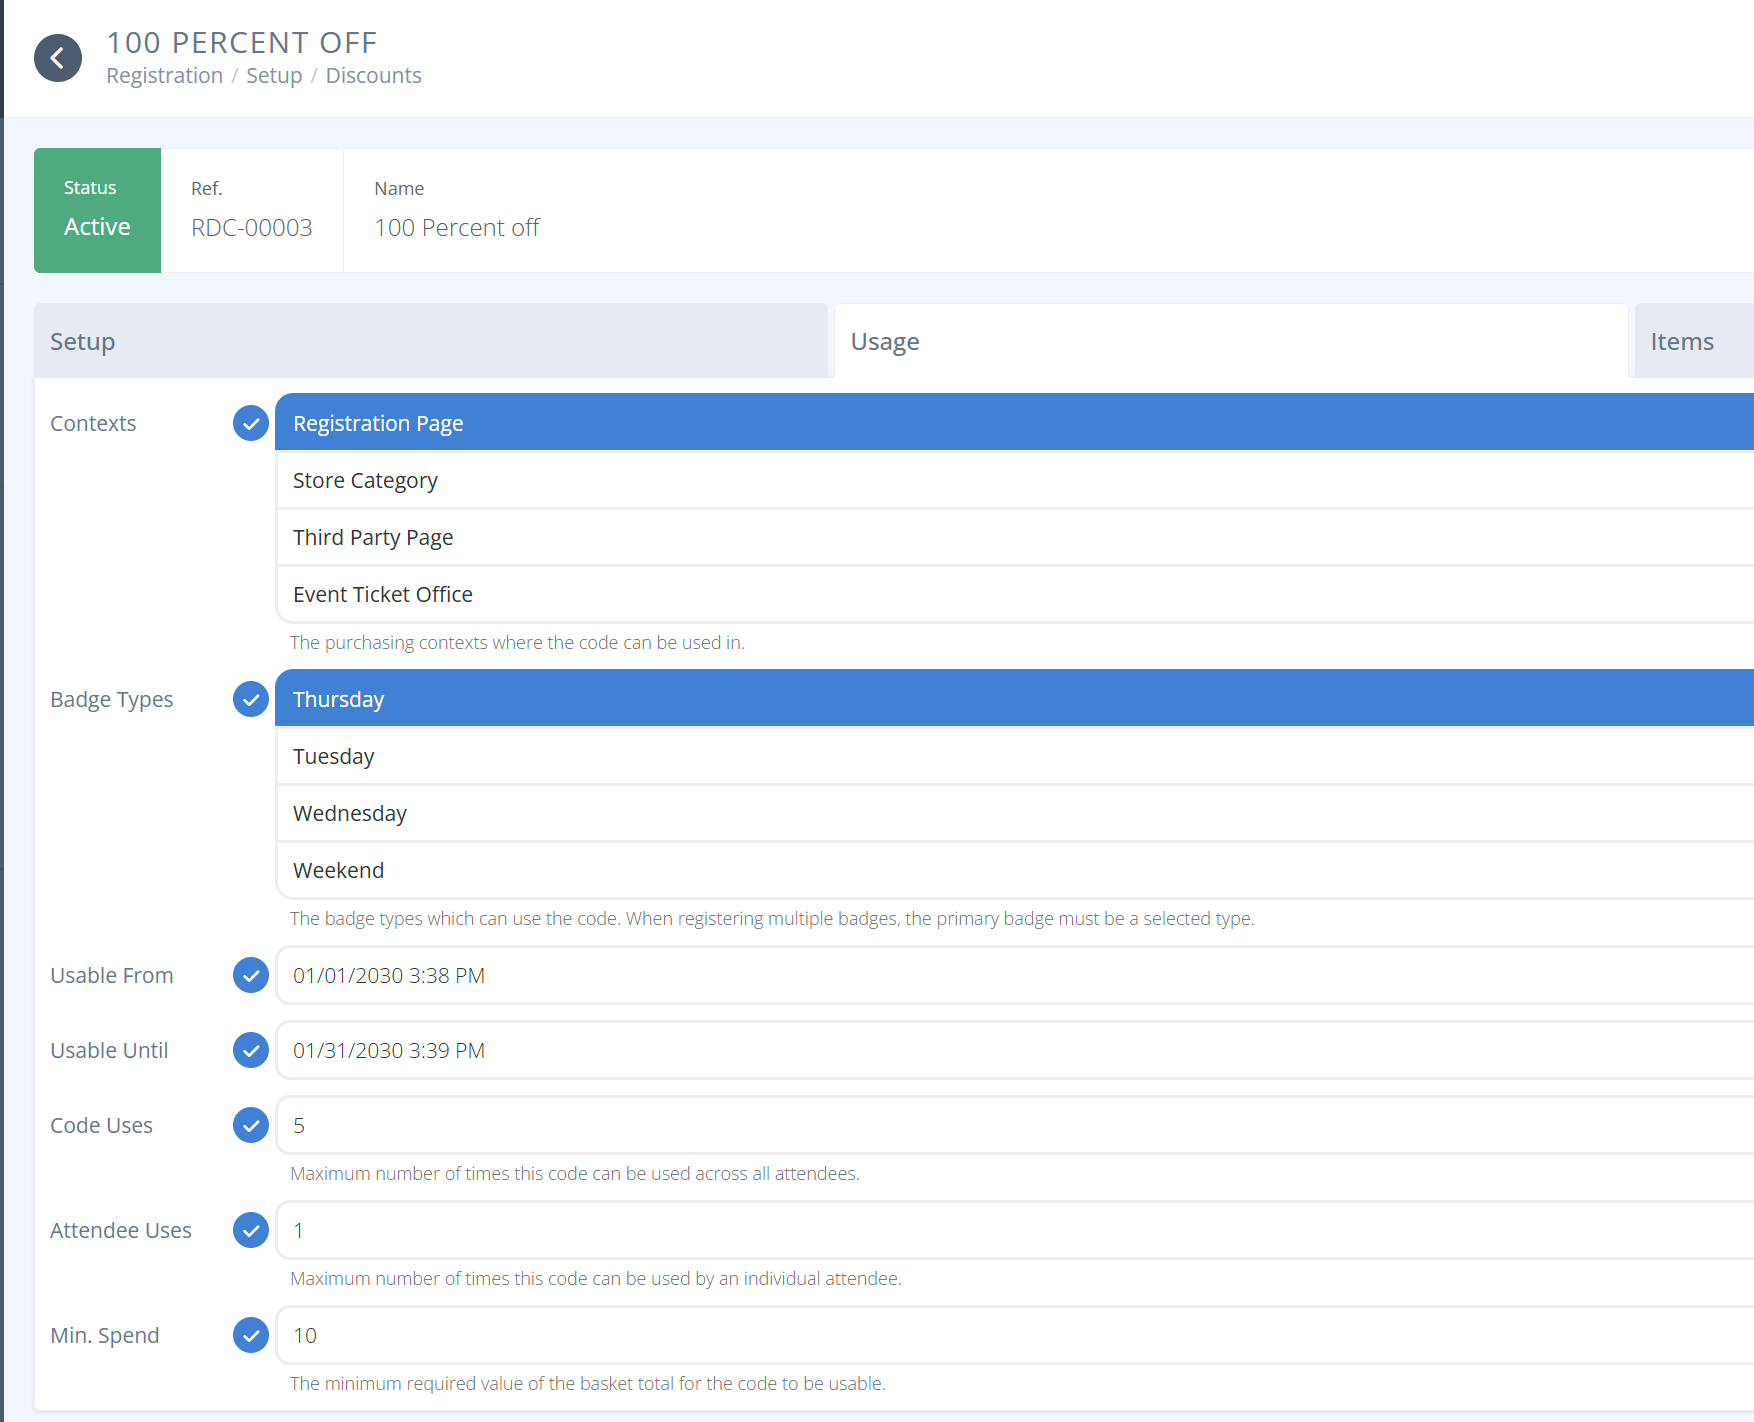 -
- Contexts: When can the discount be used
- Registration Page - On registration pages.
- Store Category - In Store purchases.
- Third Party Page - On other pages
- Event Ticket Office - For ticket purchases
Badge Types: Which badge types can use the code.
Usable From: Start date for validity of the discount code. Default is immediately.Usable Until: End date for validity of the discount code. Default is indefinately.Code Uses: (Single Code only) - How many times can the discount code be used before no longer being valid.Attendee Uses: - How many times can the discount code be used by an indvidual before no longer being valid.Min. Spend: The minimum amount that must be in the basket for the code to be valid.

Min Items: The minimum number of items that need to be in the basked for the code to be valid.Max Items: The maximum number of items that need to be in the basket for the code to be valid.Eligibility: Define which items will count towards the discount (e.g. percentage, min spend, etc) - Any item, By Type (e.g. badge), By Tag (e.g. clothing), By Specific Item (search and select).
-Any: The code applies to any items in the basket.
-By Type: The codes only applies to any items of the selected types. Then select the types.
-By Tag: The codes only applies to any items with the selected tags. Then select the tags.
-Specific Items: The codes only applies to specific items selected.Items: (Specific Items Only) List of items that apply to the Specific Items.

Required: Define the items, if any, that an attendee must already have purchased previously to qualify for the discount. Only applies to Store Category or Ticket Office purchases.Comps: Define what comped items the discount code will automatically give. The attendee will receive these items in addition to what they are purchasing.
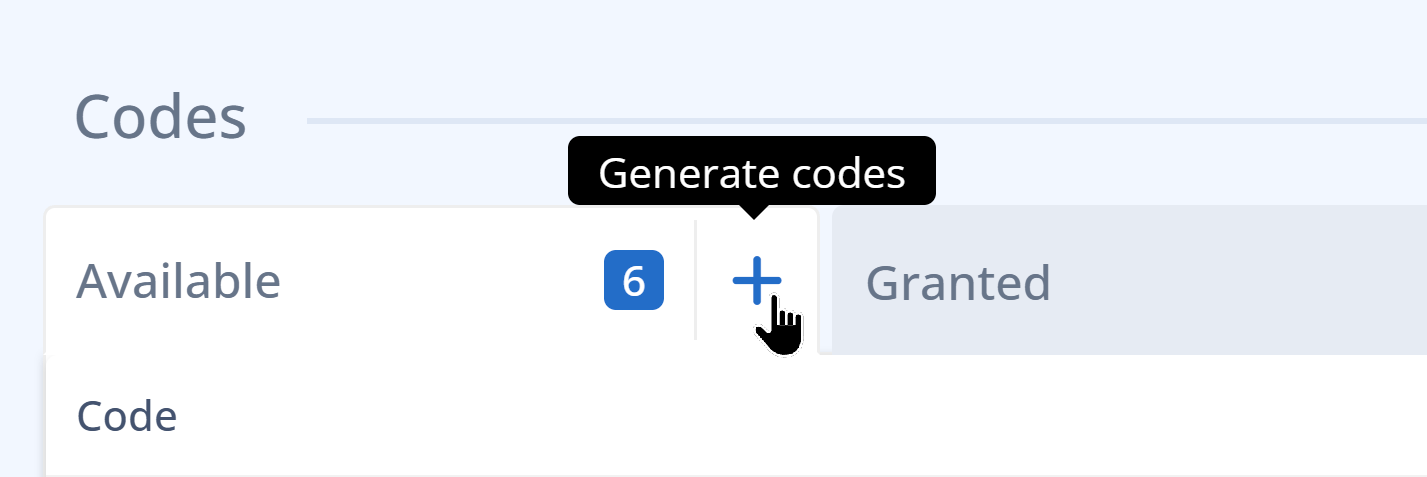
Codes: Here you will manage your unique discount codes for the selected item.- Available Tab: Shows any available codes that have not yet been granted.
- Granted Tab: Shows the unique codes that have already been Granted, but that still have not been Used.
- Used Tab: Shows the unique codes that have already been used.
¶ Procedures
¶ Create a Discount
Creating a discount has some core options and then a plethora of optional settings that are set after the core has been saved.
- From the menu under the section Setup. Click
- Click in the actions area of the screen.
- Enter the Name of your discount (e.g. Full Badge Discount)
- Enter the Description of your discount. Be sure to describe what the discount code is for, what it does and the requirements needed for it to be valid. Make your description clear, as attendee will see it if their code is rejected.
- Select the Status of your code either Active or Disabled
- Select the Format of your code either Single Code or Unique Code
a. For Single Code enter the Code that you want attendeses to enter to receive the discount (max of 32 characters).
b. Fpr Unique Codes a new section will appear once saved. - Select the Type of discount either Amount, Percent, or Comp
a. For Amount and Percent enter the Discount in dollars for the former and the percent for tha later.
c. For Percentage enter the Max Value of the discount or leave blank to have no limit.
b. For Comp you will need to enter the comped items under the Other tab once the discount has been saved. - Click
- Proceed to Modify a Discount to set your options. Refer to the Fields for details on all of the options.
¶ Discount Code for a Free Item(s) With No Other Purchase Required
- We recommend using the 100% percentage choice and limiting the basket to a minimum and maximum of the number of items to be given. You may want to additionally restrict the badges that it applies to and the eligible items that it applies to.
- The case where this is most helpful is when a badge(s) is being granted to someone through a discount code that is used during registration, but the badges available may be different prices depending on when the code is used. ie) Early Bird vs At The Door.
- The maximum amount can be used to further restrict the discount as needed.
¶ Discount Code for a % Off Specific Items
- Be sure to set the eligibility items that you wish the discount to apply to. It will apply to ALL items in the basket that meet that criteria.
- If you only want it to apply to a specific number of items be sure to set the maximum number of items to the amount you wish the code to apply to. Add a note in the description that explains the limit on the number of items it applies to.
e.g.) To provide a 50% off code at registration to Weekend Badges up to a limit of 2.
-> Set the Type to Percent
-> Set the Discount to 50
-> Set the Context to Registration Page
-> Set the Badge Types to Weekend Badges (the type(s) that match your weekend badges.
-> Set the Max Items to 2
-> Set the Elgiibility to Specific Items
-> Add all items that you want the discount to apply to in Items
-> Set the description to 50% off up to two weekend badges - No other items may be in the basket during this transaction
¶ Discount Code for $ Off a Basket
- The $ amount entered applies to the entire basket even if it exceeds the cost of the eligible item.
- If you only want it to apply to one item or not exceed the value of an item, be sure to set the Max Items to one and add a note in the description that for the discount to be applied properly the basket must only cantain that one item.
e.g.) To provide a 40 dollar discount to a purchaser of a Friday badge that costs 30 giving them 10 of additional discount on other items in the basket
-> Set the Type to Amount
-> Set the Discount to 40
-> Set the Badge Types to Friday Badges (the type(s) that match your Friday badges)
-> Set the decription to 40$ off your basket when you purchase a Friday badge
¶ Discount Code for Comped Item(s) With Purchase
- The comped items will be added when the discount is applied. It does not apply to any items already in the basket.
e.g.) To comp 3 Tickets to someone with the discount code who is buying a Saturday badge
-> Set the Type to Comp
-> Set the Badge Types to Saturday Badges (the type(s) that match your Satuday badges)
-> Add the Ticket Item to the Comps list 3 times
¶ Delete a Discount
- From the Discounts grid Click the Discount you wish to delete.
- The detailed view will be displayed. In the top right click the button
- Confirm the deletion by clicking
¶ Modify a Discount
- If you just saved your discount you will already be on the detailed screen skip to step 4.
- From the Discounts grid clikc the Discount you want to modify.
- Browse through the Usage, Items, and Other tabs to set various options. Full details are shown in the Fields section. All choices on these tabs are optional and may be added as you want the code to work.
a. Usage Tab Defines the requirements for, when, and how often the code can be used.
b. Items Tab Defines how the contents of the basket qualify the discount code, if at all.
c. Other Tab Defines comps and items that must already be held for the code to apply. - For discounts using Unique Codes the Codes Section can be used to add, grant, revoke, and delete unique codes.
¶ Work with Unique Codes
¶ Generate Unique Codes
- Click the blue button to generate more unique codes.
- Enter the number of codes you want to generate and click .
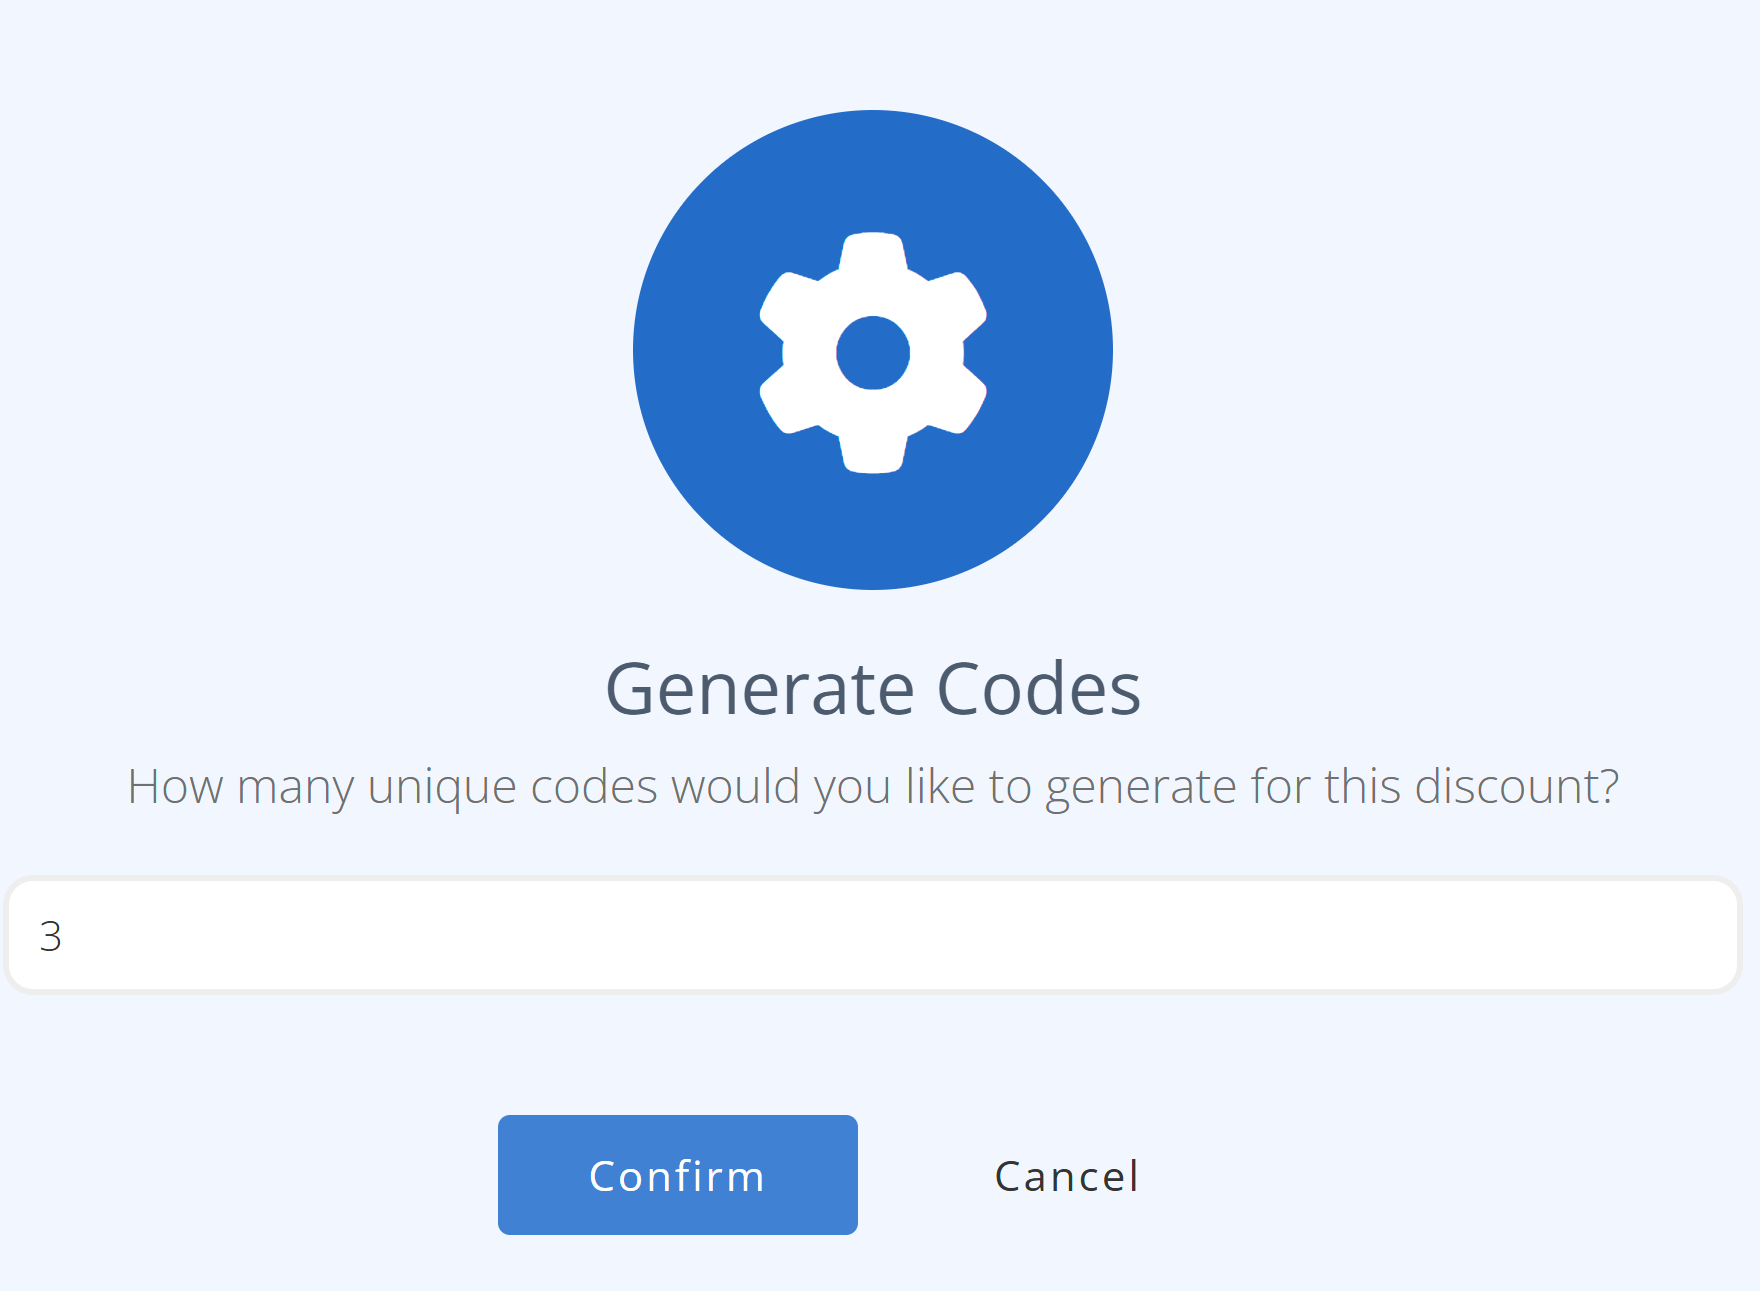
- The new codes will appear in the Available Tab.
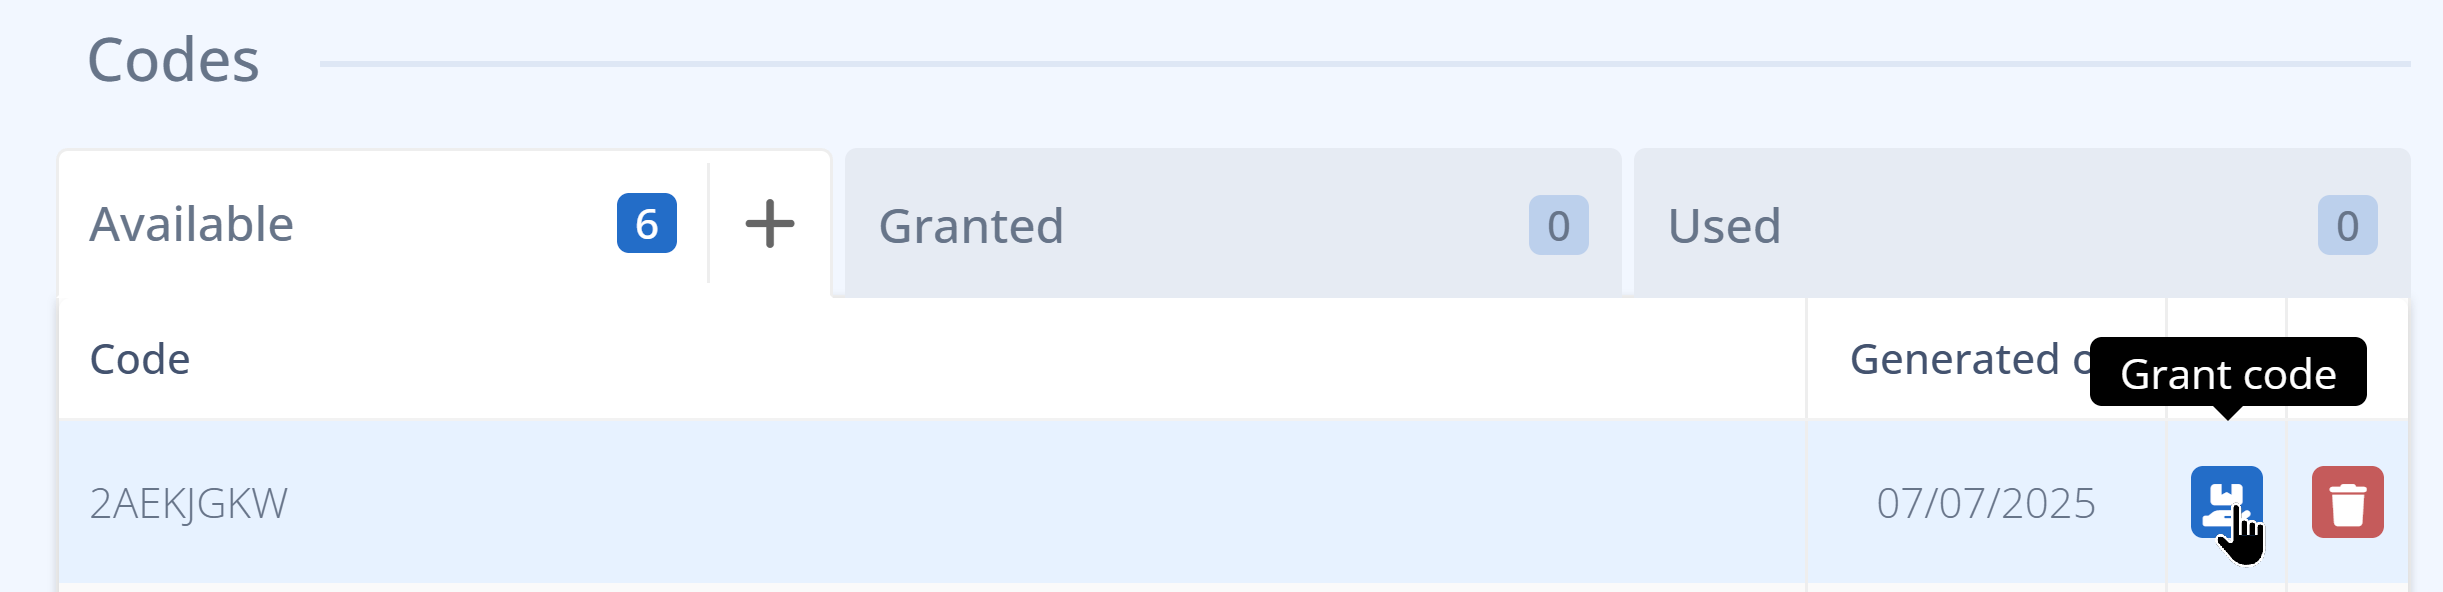
¶ Grant Unique Code
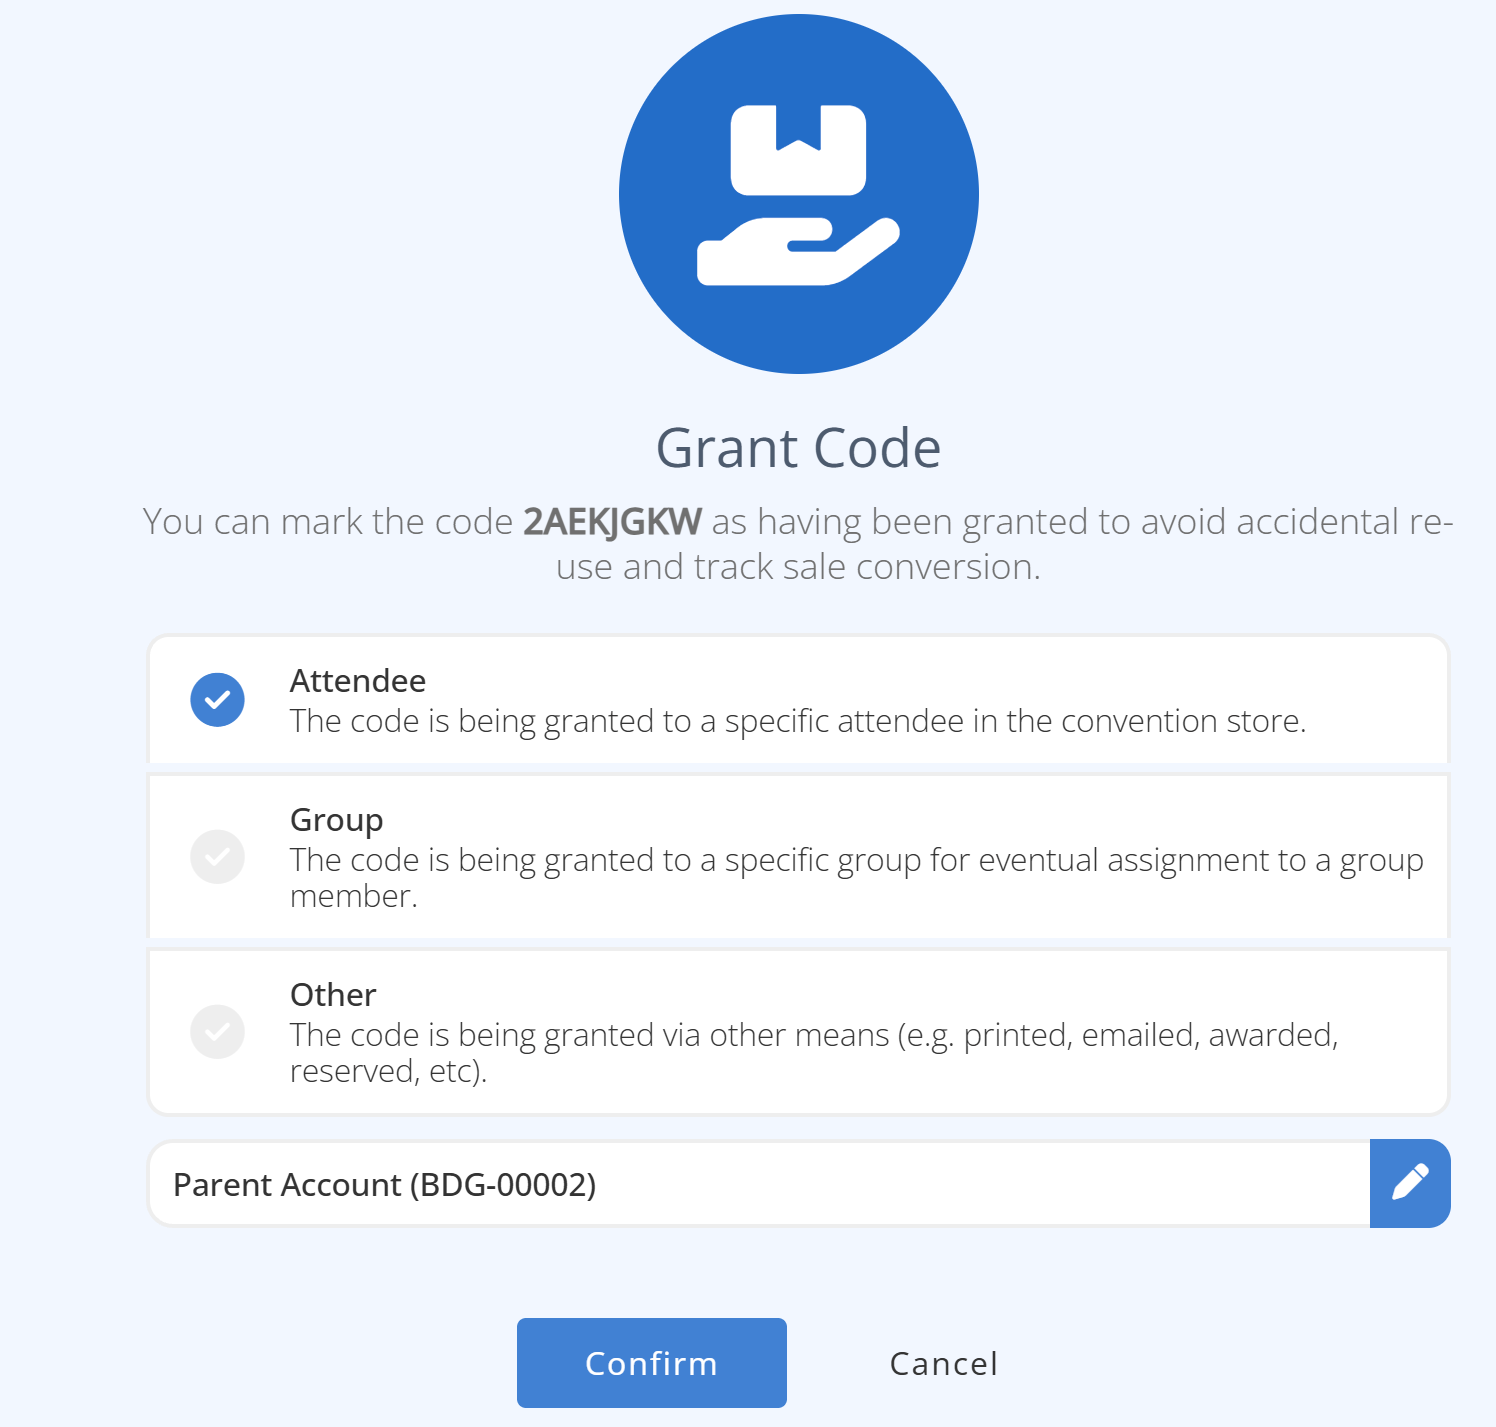
- Grant Code: Click the blue button on the far right of the unique code to grant it.
- Select Attendee, Group, or Other
a. For Attendee or Group search for the badge or group by name that you wish to grant the code to.
b. For Other enter a description when you want to grant the code via other means (e.g. printed, email, awarded, etc.).
¶ Revoke a Unique Code
- Click the Granted Tab
- Click the red button on the far right of the unique code you want to revoke.
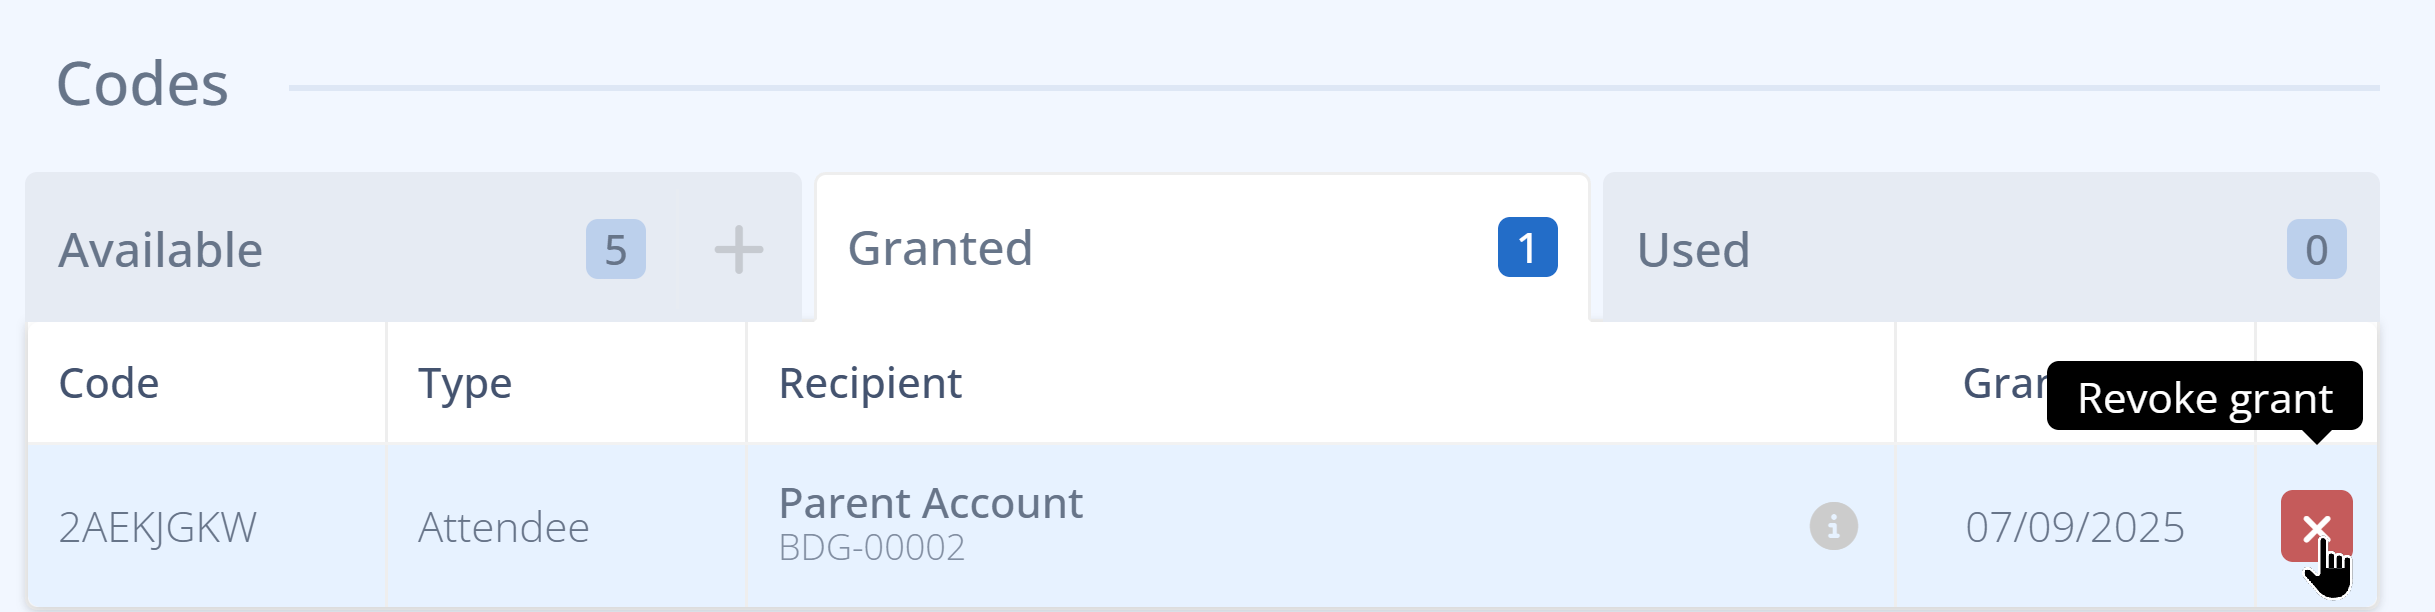
- Click Confirm and the code moves back to the Available tab.
¶ Delete Unique Code
- Click the red button on the far right of the unique codes you want to delete.
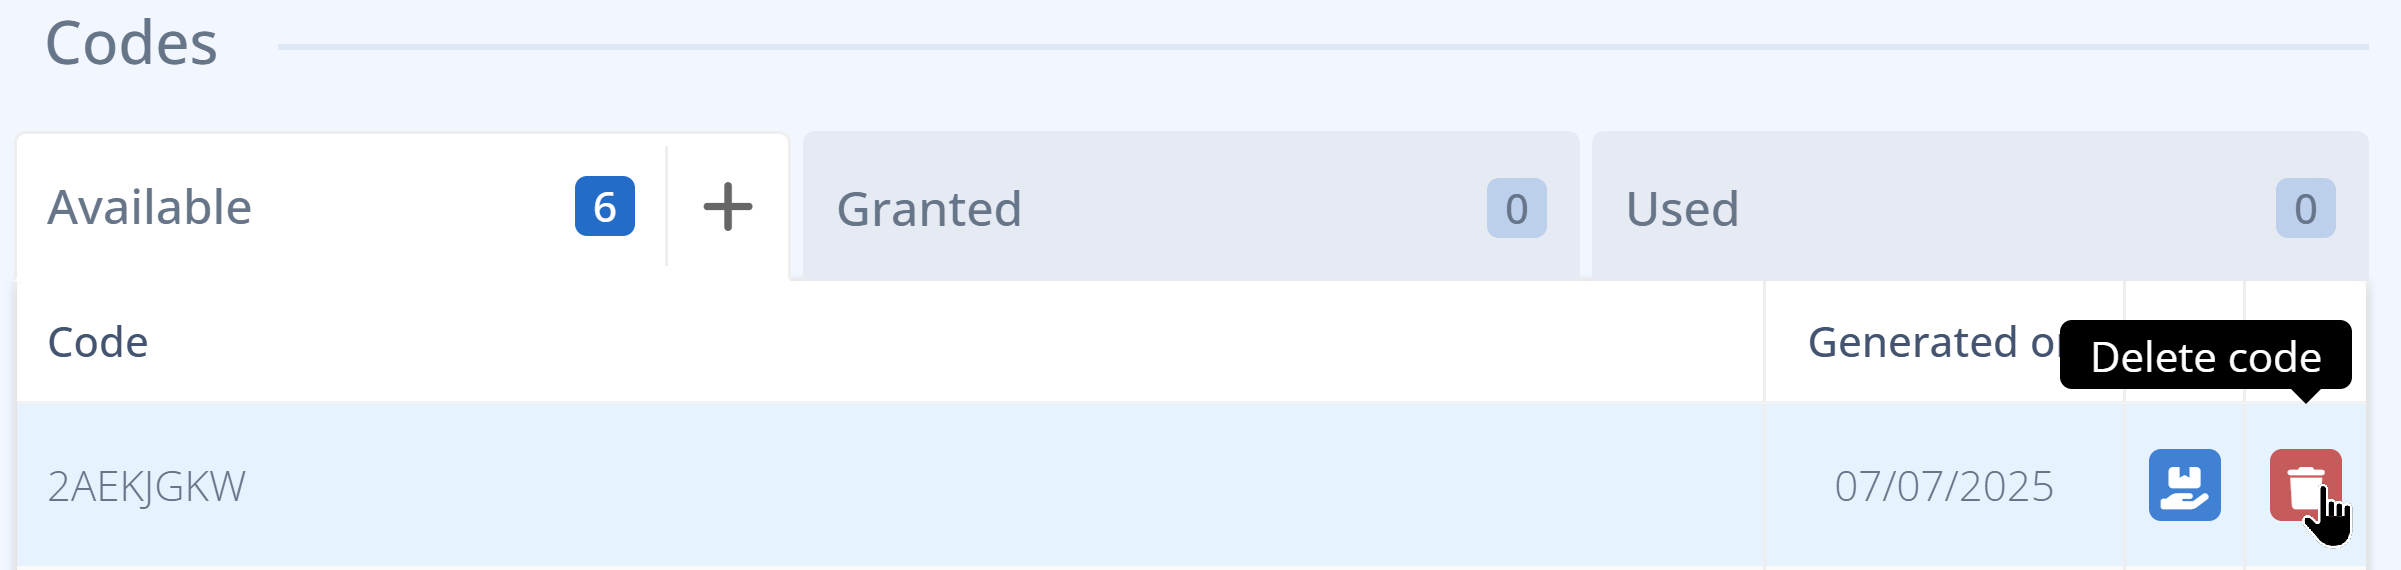
- Click Confirm to finalize the deletion.