¶ Assistant
¶ Overview
Manage access and permissions for the Assistant Apps to aid with Registration, Ticket Validation, and Library activities.
Create unique login codes that provide specific access to activites allowing volunteers and staff to complete assigned tasks.
¶ Common Procedures
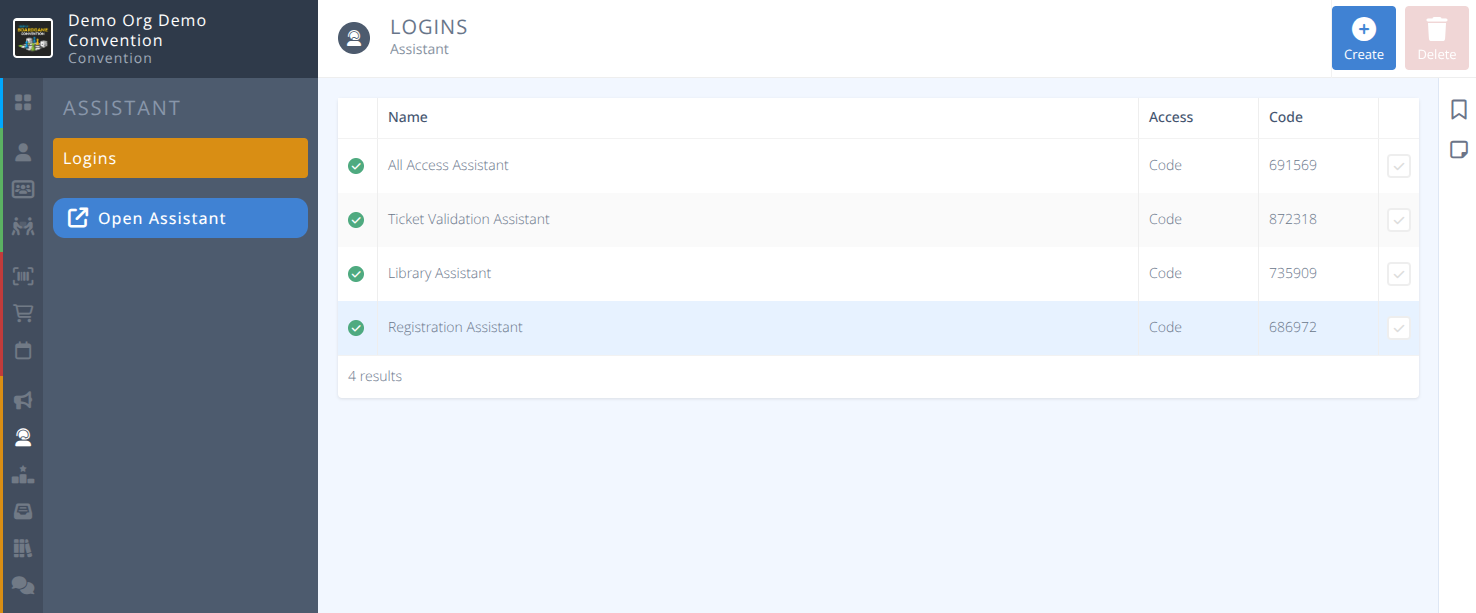
Create an Assistant- Create an assistant with the specified scope for volunteers.Open an AssistantBadge Creation- Administratively create a badge bypassing registration and payment (At the Door Cash Sales)Badge Printing- Print a Badge using a local printer.Badge Checkin- Checkin an Attendee at a Convention and collect items.Library Checkout- Handle Library checkouts/ins.Report Game Issue- Report an issue with a Library Item.Event Tickets- Validate Event Tickets.
¶ Fields
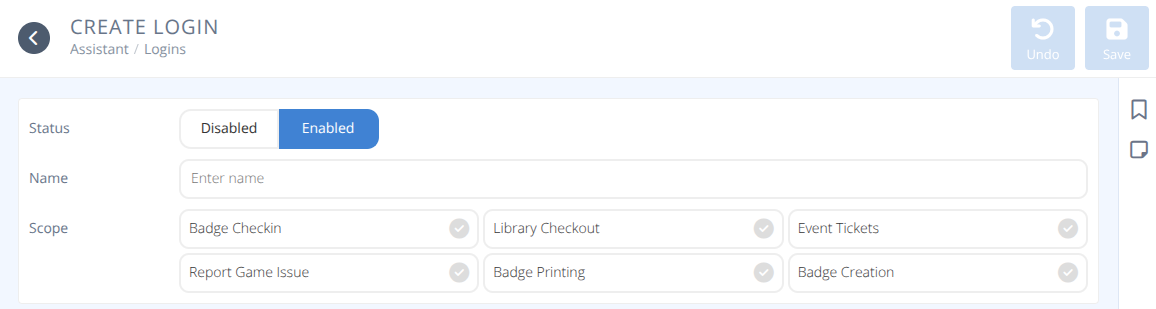
Status- The status of the assistant, either:
Enabled - The assistant can be accessed and is available for use.
Disabled - The assistant can no longer be logged into from a device with the noted code.Name- The name of the assistant. This is for internal usage only.Type- The type of the assistant. Currently this will always be CodeCode- The code used to login to this assistant.Scope- A selection of actions that is permitted by this assistant, one or more of:
¶ Scopes
| Process | Description |
|---|---|
| Badge Checkin | Allow the collection of badges and items during the registration checkin process. |
| Badge Printing | Allow the display and printing of a badge onsite using a local printer. |
| Badge Creation | Allow badges to be administratively created without need for registration or payment. |
| Library Checkout | Allow the checkin and out of games from the library. |
| Report Game Issue | Allow the reporting of issues with games (e.g. missing rules) |
| Event Tickets | Allow for the scanning and validation of tickets for an event. |
¶ One Pagers
One page how to guides that can be printed and used by volunteers.
¶ Registration One Pagers
¶ Library One Pagers
¶ Event Tickets One Pager
¶ Procedures
¶ Create An Assistant
- From the menu and sub-menu click .
- Specify the Name of the Assistant.
- Select the desired scopes for the Assistant.
- Click .
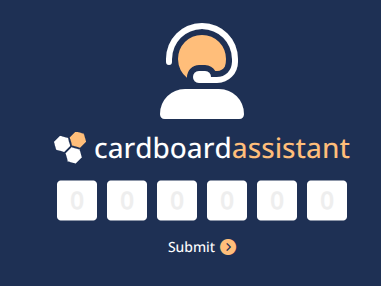
¶ Open An Assistant
- From the menu and sub-menu locate the assistant you wish to access and note the login Code.
- Either click on the button or in a compatible browser login navigate to assistant.cardboardevents.com
Compatablility Notes:
- The Silk browser on Amazon Fire Tablets is not compatible with the Assistant. Manually installing Firefox on this device has been proven to work for these devices, but the process is not covered here.
- There is a known issue with Chrome running on Android devices that prevents logging into the assistant. We recommend using Firefox in this situation.
- On the Cardboard Assistant login screen enter the code noted in step 1.
¶ Badge Creation
Create a single badge before printing. This is most useful for walkup Badge Sales or Comping a Badge at the door.
Note: This process skips the registration form and payment methods provided by your registration page.
No sales record will be created for badges created this way.
Badge fees still apply.
![]()
- After
Opening an Assistantthat has Badge Creation as part of its scope select the Badge Creation button. - Enter the required fields for the badge.
- A valid E-mail address that is not currently being used by an attendee is required to create a badge.
e.g.) parentname+childname@emailaddress.com
In this case a new account will be created with the supplied email address and login details will be rreceived by parentname@emailaddress.com.
- Select the Badge Type to be provided to the attendee.
- Carefully double check the spelling and details for the attendee.
- Click .
- You will be directly taken to the
Badge Printingpage for the created badge where it can be downloaded for printing.
¶ Badge Printing
![]()
- After
Opening an Assistantthat has Badge Printing as part of its scope select the Badge Printing button. - From the main page of the Badge Check-in Scan the QR code of the attendee or search/select the attendee's name or badge reference number and select the appropriate entry.
- The attendee's badge will be displayed on the screen. Confirm the identity of the attendee using the details shown.
- If you only wish to print the QR code and name and not the full badge click the tab.
- Click the button to download a png of the badge or label for printing.
- Click to return to the Badge Printing main screen.
¶ Badge Checkin
Use the badge check-in assistant to check in attendees when they pick up their badges and/or merchandise at registration.
![]()
- After
Opening an Assistantthat has Badge Checkin as part of its scope select the Badge Checkin button. - From the main page of the Badge Check-in Scan the QR code of the attendee or search/select the attendee's name or badge reference number and select the appropriate entry.
- A list of items requiring collection will be shown.
- Validate that the Attendee is the person shown on the screen.
- Retrieve the items listed.
- Carefully double check the list of collected items and select the corresponding checkbox to indicate that it has been collected.
- Carefully double check the list as once an item has been marked as collected and confirmed it cannot be changed back to uncollected.
- Click and provide the checked-off items to the Attendee.
- Click to return to the Badge Checkin main screen.
¶ Library Checkout

- After
Opening an Assistantthat has Library Checkout as part of its scope select the Library Checkout button. - You will be taken to the main Library Checkout screen. This will show all active loans and how long they have been checked out. Items that are past due will be highlighted for easier followup.
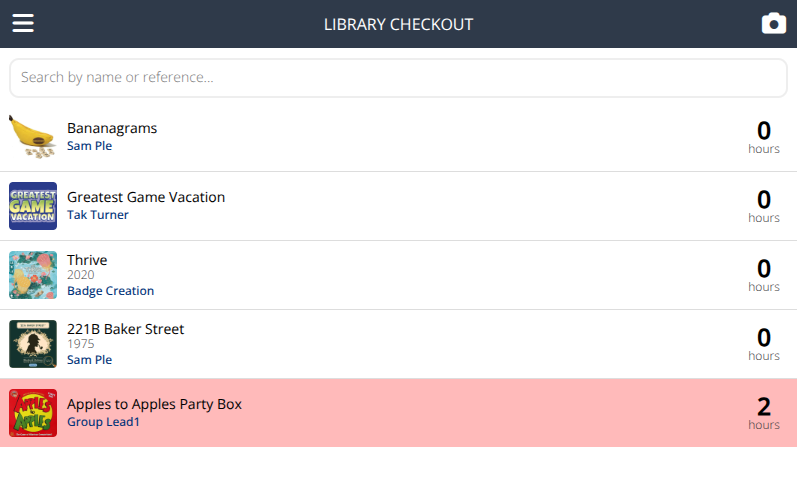
- If using a hand scanner or the built in camera function scan the game, otherwise search for the game or select it from the displayed list if checking in a game.
- If the game is currently checked out:
a. The current checkout will be displayed.
b. If there is an issue with the game reported by the attendee check the Report issue with game box and enter the details of the issue. The checkout will be updated automatically
c. If you wish to log the checkout as an anonymous play check the Log as anonymous play box.
d. Once the item has been validated click to complete the checkin process.
- If the game is not currently checked out:
a. The game will be displayed on the checkout screen.
b. Scan the badge of the attendee checking out the game. If using a built in camera or manually entering a badge you will need to tap the scan badge button.
c. If the attendee is already at their checkout limit a Too many active loans meesage will be displayed. If you wish to allow the checkout select the Ignore checkout limit checkbox and scan again.
d. Scan any additional players. This is important for Play to Win Games to ensure everyone playing recieves an entry into the draw. Attendees can also scan players in at the table using their app.
e. If the convention is using theVerificationsetting enter the value to be verified on return of the game.
e. Confirm the details of the checkout are correct and click
f. You will be returned to the Library Checkout screen and your item added to the list of checked out items.
¶ Report Game Issue

- After
Opening an Assistantthat has Report Game Issue as part of its scope select the Report Game Issue button. - You will be taken to a list of currently reported items showing when they were reported and the current status of the report.
- Click the button to create a new report or click on any displayed item to view and edit an existing report.
- If creating a new report:
a. Scan or search for the correct game.
b. Select the current status of the report and add any additional details.
c. Click - If updating a report:
a. Enter any additional details in the message box and click to add the details. They will be logged using the name of the assistant being used.
b. When finished click - Reports can be fully managed from inside the manage.cardboardevents.com interface.
¶ Event Tickets

- After
Opening an Assistantthat has Event Tickets as part of its scope select the Event Tickets button. - Locate the event that tickets will be validated for. Carefully confirm the name, date, and time of the event to confirm it is the correct one and select it.
- The event will be displayed. If it is a ticekted event a list of all attendees who have tickets for the event will be displayed.
- Click the camera to scan the badge or select the displayed name of an attendee trying to access the ticketed event.
- If a valid ticket exists it will be confirmed and the attendee admitted and the ticket marked as used. If manually selecting the badge you will be given the choice to Admit or close without any changes.
- Once validated a green checkmark will appear next to the attendees name.